Windows 10 Upgrade – Write Metrics from Registry to WMI

Like many SCCM Engineers in the End User Computing field I am working (bent on backwards, might I add) on creating a process to managing the bi-annual Windows 10 upgrades which can be repeated at least once a year. In my current environment we’re still in the early stages of testing our first upgrade where we’re looking to upgrade our estate from 1703 to 1803.

There are many ‘community champions’ (as I like to call them in my head) who have been very generous in sharing their knowledge and skills with the rest of us and thus taking out a lot of the guesswork and helping us along the way. Personally I am often inspired by their ideas which ignites a passion to do better and improve my own processes.

Sometimes I take a solution shared by a community champion and I use it as it is. Other times I have to make modifications or adapt the solution or script to suit my requirements. One such script is the SetOSDInfo.ps1 script (now renamed to Set-ComboInfo.ps1) from Gary Blok over at Garytown.com.

Recently Gary asked on Twitter if anybody’s modified or extended his script and I happened to mention my changes when he said he’d like to see it. Therefore this blog post is for Gary and anybody else who may find the script useful.

Before I post the script I’d like to take a moment to note down my reasons for modifying it. The original script from Gary is intended to be run in an OSD, Compatibility Scan and In-Place Upgrade task sequences which writes metrics to the registry and WMI. As Gary mentions in his blog post the functions which writes the data to the WMI is originally from Jason Sandy’s Set-OSDInfo script. I know the script works for many people as it is but I just couldn’t get it to work for myself, specifically the New-WMIClass function which kept throwing errors which I could not get past. Therefore I had to look elsewhere for inspiration to replace the New-WMIClass function and ended up also removing the New-WMIClassInstane function altogether. Apart from this there were a few other reasons why I had to modify the script to suit my requirements.

Firstly, I use the tattoo script from Jorgen Nilsson to write metrics to the registry during OSD, which I am very happy with, so I had no need for the OSD metrics from the script.

As for writing metrics during Compatibility Scan and IPU task sequences I prefer to write my metrics to the registry using Run Command Line steps within the Task Sequences as shown below:

thumbnail

I prefer this because I can visually see what metrics are being written in the task sequence editor without referring to the script. Also, when the time comes for me to hand over the process to my successor (whenever that time comes) I think this will help reduce some of the complexities in the task sequence. (Side note: I always endeavour to leave an environment in a better state than how I inherited it in the first place.) If I’m already writing the metrics to the registry in the task sequence then I did not need any portion of the script which writes the metrics to the registry again. Instead, what I needed was to collate the (already written) metrics from the registry and write these to WMI.

Lastly, the script requires you to create new variables with a prefix (New-Variable -Name “$($AttributePrefix)$Value” -Value $ID) which allows you to call the Get-Variable cmdlet (like $customAttributes = Get-Variable -Name “$AttributePrefix*”) that gives you an array object which you can loop through and write the data to registry and/or WMI. In my case my variables (or metrics) already start with a prefix – “CompatScan_” or “IPU_” hence I got rid of the need for the $AttributePrefix variable from the script.

I could probably expand a bit more on the script but I’m in a bit of a rush, especially since I promised Gary I’d get the script out there days ago.

Taking inspiration from Gary and Martin Bengtsson I plan on sharing my Compatibility Scan and In-Place Upgrade task sequence with the tech community as soon as I have refined my processes.

For now, here’s the scrip. You can also download it from this link.

[cmdletBinding()]

Param(

        [Parameter(Mandatory=$false)][String]$Namespace=emeneye,

        [Parameter(Mandatory=$false)][String]$Class=“IPU”,

        [Parameter(Mandatory=$false)][String]$Key=“Build”,

        [Parameter(Mandatory=$false)][String]$Build=“1803”,

        [Parameter(Mandatory=$false)][String]$RegPath=“HKLM:\Software\emeneye\Win10_Upgrade\1803″

)


# References:

# https://home.configmgrftw.com/configmgr-osd-information-script/

# https://garytown.com/collect-osd-ipu-info-with-hardware-inventory

# https://social.technet.microsoft.com/Forums/office/en-US/233a5cb3-ed1c-47f8-a495-a271f225a24e/writing-a-custom-wmi-class?forum=winserverpowershell


Clear-Host


######################################################################################################################################################

## Functions ##

######################################################################################################################################################


Function Get-WMINamespace {

[CmdletBinding()]

       Param(

        [Parameter(Mandatory=$false,valueFromPipeLine=$true)][string]$Namespace

       ) 

    Begin {

              Write-Host “Getting WMI namespace $Namespace

    }

    Process {

        If ($Namespace) {

            $filter = “Name = ‘$Namespace‘”

            $return = Get-WmiObject -Namespace “root” -Class “__namespace” -filter $filter

        }

        Else {

            $return = Get-WmiObject -Namespace root -Class __namespace

        }

    }

    End {

        Return $return

    }

}


Function New-WMINamespace {

[CmdletBinding()]

       Param(

        [Parameter(Mandatory=$true,valueFromPipeLine=$true)][string]$Namespace

       )


       If (!(Get-WMINamespace -Namespace $Namespace)) {

              $newNamespace = “”

              $rootNamespace = [wmiclass]root:__namespace

        $newNamespace = $rootNamespace.CreateInstance()

              $newNamespace.Name = $Namespace

              $newNamespace.Put(| out-null


              Write-Host “Namespace $($Namespace) created.”

       } Else {

              Write-Host “Namespace $($Namespace) is already present. Skipping..”

       }

}


Function Get-WMIClass {

[CmdletBinding()]

       Param(

              [Parameter(Mandatory=$false,valueFromPipeLine=$true)][string]$Class,

        [Parameter(Mandatory=$false)][string]$Namespace = “cimv2”

       ) 

    Begin {

              Write-Host “Getting WMI class $Class

    }

    Process {

              If (Get-WMINamespace -Namespace $Namespace) {

                     $namespaceFullName = “root\$Namespace


            Write-Host $namespaceFullName


                     If (!$Class) {

                           $return = Get-WmiObject -Namespace $namespaceFullName -Class * -list

                     } Else {

                           $return = Get-WmiObject -Namespace $namespaceFullName -Class $Class -list

                     }

              }

              Else {

                     Write-Host “WMI namespace $Namespace does not exist.”

                     $return = $null

              }

    }

    End {

        Return $return

    }

}


Function New-WMI-Class {

[CmdletBinding()]

       Param(

              [Parameter(Mandatory=$false,valueFromPipeLine=$true)][string]$Class,

        [Parameter(Mandatory=$false)][string]$Namespace,

        [Parameter(Mandatory=$false)][System.Management.Automation.PSVariable[]]$Attributes,

        [Parameter(Mandatory=$false)][string[]]$Key

       )


    # Create the Class

    $newClass = New-Object System.Management.ManagementClass(“root\$Namespace, [String]::Empty, $null);

    $newClass[“__CLASS”] = $Class;


    # Add the Key property to the WMI Class

    $newClass.Properties.Add($($Key), [System.Management.CimType]::String, $false)

    $newClass.Properties[$($Key)].Qualifiers.Add(“key”, $true)

    $newClass.Properties[$($Key)].Qualifiers.Add(“read”, $true)


    ForEach ($Attr in $Attributes) {


        Set the property value to the attribute name

        $Property = $Attr.Name


        # Remove the attribute prefix and underscores from the property name

        $Property = $Property -replace “_”,“”


        If ($Property eq “(default)”) {

            # Do nothing

        } Else {

            # Add the property to the WMI class, but not the Key which is already added above

            If (-not (($Property eq $Key))) {

                # Add the property to the WMI Class

                $newClass.Properties.Add($Property, [System.Management.CimType]::String, $false)


                Set the Read qualifier to the property

                $newClass.Properties[$Property].Qualifiers.Add(“read”, $true)

            }

        }

    }


    $newClass.Put()

}


Function Get-PropertiesAndValuesFromRegistry {

[CmdletBinding()]

       Param

    (

        [Parameter(Mandatory=$true)][string]$RegPath

       )


    Begin { 

        Push-Location

    }


    Process {

        Set-Location $RegPath


        $AllPropertiesInRegPath = Get-Item $RegPath | Select-Object ExpandProperty Property


        $Object = New-Object TypeName PSObject


        ForEach ($Property in $AllPropertiesInRegPath) {

            Add-Member InputObject $Object MemberType NoteProperty -Name $Property -Value (Get-ItemProperty -Path $RegPath -Name $Property).$Property

        }


        return $Object.PSObject.Properties


    }

    End {

        Pop-Location

    }

}


######################################################################################################################################################

## Write CompatScan Return Code and Error Message to Registry ##

######################################################################################################################################################


If ($Class eq CompatScan) {

    $TSEnv = New-Object ComObject Microsoft.SMS.TSEnvironment


    [int64]$decimalreturncode = $TSEnv.Value(“_SMSTSOSUpgradeActionReturnCode)

    $hexreturncode = “{0:X0}” -f [int64]$decimalreturncode

    #[int64] $hexreturncode = 0xC1900210


    $WinIPURet = @(

    @{ Err = “C1900210”Msg = ‘No compatibility issues.’}

    @{ Err = “C1900208”Msg = ‘Incompatible apps or drivers.’ }

    @{ Err = “C1900204”Msg = ‘Selected migration choice is not available.’ }

    @{ Err = “C1900200”Msg = ‘Not eligible for Windows 10.’ }

    @{ Err = “C190020E”Msg = ‘Not enough free disk space.’ }

    @{ Err = “C1900107”Msg = ‘Unsupported Operating System.’ }

    @{ Err = “80070652”Msg = ‘Previous Install Pending, Reboot.’ }

    @{ Err = “8024200D”Msg = ‘Update Needs to be Downloaded Again.’ }

    @{ Err = “0”Msg = ‘Windows Setup completed successfully.’ }

    )


    $ErrorMsg = $winipuret | ? err eq $hexreturncode  | % Msg


    # Write hexreturncode and errormsg to registry

    New-ItemProperty -Path $RegPath -Name CompatScan_HexReturnCode -Value $hexreturncode PropertyType String -Force

    Set-ItemProperty -Path $RegPath -Name CompatScan_ErrorMessage -Value $ErrorMsg

}


######################################################################################################################################################

## Write Username to Registry ## – This is the username of the person who kicks off the installation from Software Center

                              ## – See Gary Blok’s post at # https://garytown.com/gather-user-account-name-during-ipu

######################################################################################################################################################


If ($Class eq “IPU”) {

    If ($TSEnv.Value(“_SMSTSUserStartedeq $true) {

        # Get the username from the task sequence variable, which is set earlier in the task sequence

        # $UserAccount =$env:USERNAME

        $UserAccount = $TSEnv.Value(IPU_UserAccount)


        # Write the username to the registry

        New-ItemProperty -Path $RegPath -Name IPU_UserAccount -Value $UserAccount PropertyType String -Force

    }

}


######################################################################################################################################################

## Collate metrics from registry and set variables ##

######################################################################################################################################################


$PropertiesAndValuesFromRegistry = Get-PropertiesAndValuesFromRegistry RegPath $RegPath


$PropertiesAndValuesFromRegistry | Where-Object {$_.Name -like $Class*”| ForEach-Object {

    Set the variable name and value

    $Name = $_.Name

    $Value = $_.Value


    # Remove the variable if it already exists

    Remove-Variable -Name $Name ErrorAction SilentlyContinue


    # Create new variable

    New-Variable -Name $Name -Value $Value

}


######################################################################################################################################################

## Create the WMI Namespace and Class if they do not already exist ##

######################################################################################################################################################


# Create WMI Namespace

If (-not (Get-WMINamespace -Namespace $Namespace)) {

    # Namespace does not exist, proceed to create Namespace

    Try {

        New-WMINamespace -Namespace $Namespace

    } Catch {

        Write-Host “Error creating WMI namespace $Namespace

    }

}


# Create WMI Class

If (-not (Get-WMIClass -Class $Class -Namespace $Namespace)) {

    # Class does not exist


    # Collate all attributes

    $Attributes = Get-Variable -Name $Class*”


    Now create the WMI class

    New-WMI-Class -Class $Class -Namespace $Namespace -Attributes $Attributes -Key “Build”

Else {

    # Class does exist


    If an instance already exists with the same Build then delete the instance

    $Instance = Get-CimInstance ClassName $Class -Namespace root/$Namespace | Select Build ErrorAction SilentlyContinue

    If ($Instance.Build eq $Build) {

        Get-CimInstance ClassName $Class -Namespace root/$Namespace | Remove-CimInstance

    }

}


######################################################################################################################################################

## Collate all variables and create a WMI Class Instance

######################################################################################################################################################


# Get all attributes

$Attributes = Get-Variable -Name $Class*”


# Create empty hash table

$PropertyHash = @{}


# Loop through each attribute and populate the hash table

ForEach ($Attr in $Attributes) {

    Set the attribute name and clean it up – underscores and dashes causes the Set-WMIInstance cmdlet to fail

    $AttrName = $Attr.Name

    $AttrName = $AttrName -replace “_”,“”

    $AttrName = $AttrName -replace “-“,“”


    Set the attribute value

    $AttrValue = $Attr.Value


    # Add the attribute name and value to the hash table

    $PropertyHash.Add($($AttrName),$($AttrValue))

}


# Add the key value

$PropertyHash.Add($($Key),$($Build))


# Remove the (default) property – this errors out otherwise

$PropertyHash.Remove(“(default)”)


Create new WMI Class Instance, i.e. populate the class

Set-WmiInstance -Path \\.\root\$($Namespace):$Class -Arguments $PropertyHash

Choose a Disk to Install Windows on using WPF and PowerShell

I recently tweeted a screenshot of a GUI I created using WPF and PowerShell to let engineers choose the disk to install Windows on, intended to be used in a SCCM Task Sequence. I was then asked by (none other than!) David Segura to share this with the rest of the community.

In my last post I wrote about how I found a workaround to a snag I hit upon while using the MahApps.Metro theme. That was almost 10 months ago. That post was meant to be a precursor to introducing this GUI but I got busy with life and my new job so the blog took a back seat. I’m glad that David’s reply has spurred me on to write this post and introduce the GUI. (I also have a few more posts lined up inspired by Gary Blok’s endeavour to break away from MDT and go native ConfigMgr. More on that soon.)

Update 1: I included steps in the Task Sequence to make the GUI appear only if more than one disk is present, as suggested by Marcel Moerings in the comments.

Update 2: I updated the script to exclude USB drives.

Background

SCCM will install the OS on disk 0 by default. In my previous environment two disk configurations were very common so I created this GUI for Engineers to choose the disk to install Windows on. This works by leveraging the “OSDDiskIndex” task sequence variable. If you set this variable to your desired disk number then SCCM will install the OS on that disk.

This is what the GUI looks like when run in full OS:

clip_image003

And this is what it looks like when run in a Task Sequence:

clip_image005

Prerequisites

You will need to add the following components to your Boot Image:

  • Windows PowerShell (WinPE-PowerShell)
  • Windows PowerShell (WinPE-StorageWMI)
  • Microsoft .Net (WinPE Dot3Svc)

How to Implement

Simples :)

  • Download the solution and extract the zip file
  • Create a standard package with the contents of the zip file. Do not create a program.
  • In your task sequence add a Group called “Choose Disk” before the partitioning steps
  • Within the group add a Run Command Line task and name it “Check if there’s more than one Hard Disk”. Enter the following one-liner:
PowerShell.exe -NoProfile -Command "If ((Get-Disk | Where-Object -FilterScript {$_.Bustype -ne 'USB'}).Count -gt 1) {$TSEnv = New-Object -COMObject Microsoft.SMS.TSEnvironment;$TSEnv.Value('MoreThanOneHD') = $true}"

one liner

  • Add another Run Command Line step and name it “Choose Disk to Install OS”, and choose the package you created. Add the following command line:
%SYSTEMROOT%\System32\WindowsPowerShell\v1.0\powershell.exe -STA -NoProfile -ExecutionPolicy Bypass -File .\ChooseDiskWPF.ps1

choose disk

  • In the Options tab for the “”Choose Disk to Install OS” step, Click on Add Condition > Task Sequence Variable > type “MoreThanOneHD” in the variable field, set the condition to “equals” and the value to “TRUE”

condition

Bear in mind that this does not exclude removable drives. This is because I always run a set of pre-flight checks as a first step which weed out any removable drives before this GUI is presented hence looking out for removable drives was not duplicated in this solution.

The Code

Clear-Host 


# Assign current script directory to a global variable

$Global:MyScriptDir = [System.IO.Path]::GetDirectoryName($myInvocation.MyCommand.Definition)


# Load presentationframework and Dlls for the MahApps.Metro theme

[System.Reflection.Assembly]::LoadWithPartialName(“presentationframework”| Out-Null

[System.Reflection.Assembly]::LoadFrom($Global:MyScriptDir\assembly\System.Windows.Interactivity.dll”| Out-Null

[System.Reflection.Assembly]::LoadFrom($Global:MyScriptDir\assembly\MahApps.Metro.dll”| Out-Null


Temporarily close the TS progress UI

$TSProgressUI = New-Object COMObject Microsoft.SMS.TSProgressUI

$TSProgressUI.CloseProgressDialog()


# Set console size and title

$host.ui.RawUI.WindowTitle = “Choose hard disk…”


Function LoadForm {

    [CmdletBinding()]

    Param(

     [Parameter(Mandatory=$True,Position=1)]

     [string]$XamlPath

    )


    # Import the XAML code

    [xml]$Global:xmlWPF = Get-Content -Path $XamlPath


    Add WPF and Windows Forms assemblies

    Try {

        Add-Type AssemblyName PresentationCore,PresentationFramework,WindowsBase,system.windows.forms

    }

    Catch {

        Throw “Failed to load Windows Presentation Framework assemblies.”

    }


    #Create the XAML reader using a new XML node reader

    $Global:xamGUI = [Windows.Markup.XamlReader]::Load((new-object System.Xml.XmlNodeReader $xmlWPF))


    #Create hooks to each named object in the XAML

    $xmlWPF.SelectNodes(“//*[@Name]”| ForEach {

        Set-Variable -Name ($_.Name) -Value $xamGUI.FindName($_.Name) -Scope Global

    }

}


Function Get-SelectedDiskInfo {

    # Get the selected disk with the model which matches the model selected in the List Box

    $SelectedDisk = Get-Disk | Where-Object $_.Number eq $Global:ArrayOfDiskNumbers[$ListBox.SelectedIndex] }


    # Unhide the disk information labels

    $DiskInfoLabel.Visibility = “Visible”

    $DiskNumberLabel.Visibility = “Visible”

    $SizeLabel.Visibility = “Visible”

    $HealthStatusLabel.Visibility = “Visible”

    $PartitionStyleLabel.Visibility = “Visible”


    # Populate the labels with the disk information

    $DiskNumber.Content = $($SelectedDisk.Number)

    $HealthStatus.Content = $($SelectedDisk.HealthStatus)$($SelectedDisk.OperationalStatus)

    $PartitionStyle.Content = $SelectedDisk.PartitionStyle


    # Work out if the size should be in GB or TB

    If ([math]::Round(($SelectedDisk.Size/1TB),2lt 1) {

        $Size.Content = $([math]::Round(($SelectedDisk.Size/1GB),0)) GB”

    }

    Else {

        $Size.Content = $([math]::Round(($SelectedDisk.Size/1TB),2)) TB”

    }

}


# Load the XAML form and create the PowerShell Variables

LoadForm XamlPath $MyScriptDir\ChooseDiskXAML.xaml


# Create empty array of hard disk numbers

$Global:ArrayOfDiskNumbers = @()


# Populate the listbox with hard disk models and the array with disk numbers

Get-Disk | Where-Object -FilterScript {$_.Bustype -ne ‘USB’} | Sort-Object {$_.Number}| ForEach {

    # Add item to the List Box

    $ListBox.Items.Add($_.Model) | Out-Null


    # Add the serial number to the array

    $ArrayOfDiskNumbers += $_.Number

}


# EVENT Handlers

$OKButton.add_Click({

    If no disk is selected in the ListBox then do nothing

    If (-not ($ListBox.SelectedItem)) {

        # Do nothing

    }

    Else {

        Else If a disk is selected then get the disk with matching disk number according to the ListBox selection

        $Disk = Get-Disk | Where-Object {$_.Number eq $Global:ArrayOfDiskNumbers[$ListBox.SelectedIndex]}


        Set the Task Sequence environment object

        $TSEnv = New-Object COMObject Microsoft.SMS.TSEnvironment


        # Populate the OSDDiskIndex variable with the disk number

        $TSEnv.Value(OSDDiskIndex= $Disk.Number


        # Close the WPF GUI

        $xamGUI.Close()

    }

})


$ListBox.add_SelectionChanged({ 

    # Call function to pull the disk informaiton and populate the details on the form

    Get-SelectedDiskInfo

})


# Launch the window

$xamGUI.ShowDialog(| Out-Null

Unable to Import MahApps.Metro DLL Files using PowerShell in SCCM/MDT Boot Image

I’ve been working on converting some of my PowerShell scripts for SCCM into Graphical User Interfaces (GUIs), specifically using Windows Presentation Foundation (WPF). I’ve been a long admirer of the ConfigMgr OSD Front End from scconfigmgr.com by Nickolaj Andersen who pointed me to the MahApps.Metro theme when I complimented him on the aesthetics of his Front End.

I’d recommend checking out the instructions by Kevin Rahetilahy on his blog at dev4sysblog and Damien Van Robaeys’s how-to video on creating WPF GUIs and applying the MahApps.Metro theme.

Now, coming back to this post. Getting the MahApps.Metro theme to work with the WPF GUI requires loading a couple of DLL files in the PowerShell script but annoyingly I ran into a problem where the DLLs wouldn’t import in the SCCM/MDT boot images In WindowsPE but works flawlessly in Windows 10. This is the error message I was getting:

“Could not load file or assembly MahApps.Metro.dll or one of its dependencies. Operation is not supported.”

image

Attempting to load “System.Windows.interactivity.dll” also threw the same error message. I also tried changing the DLL files from .Net 4.0 to 4.5 and also tried solutions from the community which presented me with the same error message each time. I knew these community solutions work in other environment so there was something definitely wrong from my end.

After trying a lot of different things I finally managed to resolve this with a workaround. Here’s what I done.

First, let’s take a look at the three DLLs I’ve been trying to load in my script.

[System.Reflection.Assembly]::LoadWithPartialName("presentationframework")
[System.Reflection.Assembly]::LoadFrom("$MyScriptDir\assembly\MahApps.Metro.dll")
[System.Reflection.Assembly]::LoadFrom("$MyScriptDir\assembly\System.Windows.Interactivity.dll")

The first DLL, the “presentationframework.dll”, imported successfully whereas the other two failed consistently no matter what I tried. After concentrating far too long on the two problematic DLLs and failing to come up with a solution I decided to take a closer look at the “presentationframework.dll”. When I load this DLL I get the following output in my console:

image

I saw that the DLL was being loaded from “X:\WINDOWS\Microsoft.Net\assembly\GAC_MSIL\presentationframework\v4.0_4.0.0.0__31bf3856ad364e35”.

So I decided to manually create this folder structure as shown below for each of my DLL files and copy them over:

Folder structure to create and location to copy MahApps.Metro.dll:

“X:\WINDOWS\Microsoft.Net\assembly\GAC_MSIL\MahApps.Metro\v4.0_4.0.0.0__31bf3856ad364e35\MahApps.Metro.dll”

Folder structure to create and location to copy System.Windows.Interactivity.dll:

“C:\WINDOWS\Microsoft.Net\assembly\GAC_MSIL\System.Windows.Interactivity\v4.0_4.0.0.0__31bf3856ad364e35\System.Windows.Interactivity.dll”

I then tried loading the DLL files using the following lines:

[System.Reflection.Assembly]::LoadWithPartialName("System.Windows.Interactivity")
[System.Reflection.Assembly]::LoadWithPartialName("MahApps.Metro")

And voila! The two DLL files were loaded successfully!

image

The GUI and the theme works absolutely fine with this workaround. I spent a lot of time grappling with this problem so it was a relief to finally have it resolved, not to mention my GUI looks so much better with the theme. I just had to write this post not only for my own reference but also hoping it may help someone else out there too.

I’m refraining myself from inserting a screenshot of the GUI as I want to write a separate post introducing it to the community :)

Lock Down a ConfigMgr Task Sequence to an Active Directory Security Group

The ‘production’ Windows 10 build in our environment is v1607 while the Windows 10 1703 build is still undergoing testing and is yet to be given the green light. It was brought to the attention of the powers that be that 2L Engineers have been installing the test build for end user devices which has caused a fair amount of issues since it’s not ready for production yet.

My proposal is to lock down the Task Sequence to a select few members of staff. This is what I propose:

  • Prompt for username and password at the beginning of the Task Sequence
  • If the username is a member of an AD group then the user is authorised to install this build
  • Next step is to verify their authentication by attempting to map a network drive using their credentials
  • If the drive maps successfully then the user is authorised and authenticated and thus can proceed with installing the build

Important: I make use of the excellent Deployment Web Service by Maik Koster to carry out Active Directory related tasks during OSD in my lab. As such the web service is a pre-requisite to implementing the solution demonstrated in this post.

First, a demo on how this works

Here’s a video I uploaded to YouTube yesterday to demonstrate what my implementation looks like. It demonstrates the following scenarios:

  • Entering an incorrect username (which doesn’t exist in AD)
  • Entering a username which is not part of the AD group and hence is not authorised to install this build
  • Entering a username which IS authorised to install the build but an incorrect password was entered
  • Finally, the video shows entering a username and the correct password for an account authorised to install this build

Instructions on how to implement the solution

Now, let’s take a look at the instructions…

Create the Active Directory group

Create an AD security group called something like “Windows10_Build_Testers”. Add users to the group who are authorised to run the Task Sequence.

Create the shared folder

Create a shared folder called something like “TaskSequenceLockdownShare” on a server/computer and give the “Windows10_Build_Testers” group share and NTFS security permissions. This can be on any server which is guaranteed to be up and running 24/7 as it will need to be on the network when Engineers run deployments.

Edit the PowerShell script

Download the PowerShell script. Here’s what it looks like:

Clear-Host
# Temporarily close the TS progress UI
$TSProgressUI = New-Object -COMObject Microsoft.SMS.TSProgressUI
$TSProgressUI.CloseProgressDialog()
Start-Sleep 1

# Set console size and title
[console]::WindowWidth=95; [console]::WindowHeight=25; [console]::BufferWidth=[console]::WindowWidth
$host.ui.RawUI.WindowTitle = “Checking authorisation to run this build…”
# Initialise variables
$URI = http://mni-sccm01/OSDWebService/AD.asmx?wsdl”
$WebService = New-WebServiceProxy -Uri $URINamespace OSDWebService
$SharedDriveToMap = “\\mni-sccm01\TaskSequenceLockdownShare$”
$ADGroupName = “Windows10_Build_Testers”
$DomainName = “EMENEYE”
$Global:TSEnv = New-Object -COMObject Microsoft.SMS.TSEnvironment
$TaskSequenceName = $Global:TSEnv.Value(“_SMSTSPackageName”)
# Inform user this build is locked down
Write-Host “`n$TaskSequenceNameBackgroundColor DarkBlue
Write-Host “`nThe build you selected has not been released to production yet”BackgroundColor Black
Write-Host “Authentication is required to install this build…”BackgroundColor Black
# Set registry entry to prompt for credentials at the command line instead of using a dialog box
# Set-ItemProperty “HKLM:\SOFTWARE\Microsoft\PowerShell\1\ShellIds” -Name “ConsolePrompting” -Value $True
Function Get-UserCredentials {
# Get credentials
Do {
Start-Sleep 3
$Global:TSCeds = $Host.ui.PromptForCredential(“Authentication is required…”, “Please enter your username”, “”, “”)
} Until ($Global:TSCeds.UserName -ne “”)

# Check if the domain was entered. The idea is to make this script work with or without the domain name entered by the engineer
If ($Global:TSCeds.UserName -like $DomainName\*”) {
# Strip the domain from the username
$Global:Username = ($Global:TSCeds.UserName).Split(“\”)[1]
}
Else {
$Global:Username = $Global:TSCeds.UserName
}

# Proceed to check if user exists in AD
Check-UserExists
}
Function Check-UserExists {
# Get user attributes using the Web Service
$Result = $WebService.GetUserAttribute($Global:Username, “userPrincipalName”)
# Check if the user exists in AD (the attribute should have been returned and thus the variable should be populated)
If ($Result) {
# User exists in AD
# Call function to check if the user is a member of the AD group
Check-IfUserIsInGroup
}
Else {
# User does not exist in AD
Write-Host “`nThis username $($Global:Username.ToUpper()) does not exist in Active Directory”ForegroundColor RedBackgroundColor Black
Write-Host “Please try again…”BackgroundColor Black
Write-Host “”
# Call function to get user to try again
Get-UserCredentials
}
}
Function Check-IfUserIsInGroup {
# Call Web Service to get list of user’s group memberships
$Result = $WebService.GetUserGroupsByName($Global:Username)
# Check if user is in SCCM_Admins group in AD
If ($Resultcontains $ADGroupName) {
# User is a SCCM admin
Write-Host “`n$($Global:Username.ToUpper()) is authorised to install this build…”BackgroundColor Black
# Call function to check their authentication
Check-Authentication
}
Else {
# User is not in AD group
Write-Host “`nThe username $($Global:Username.ToUpper()) is not authorised to install this build”ForegroundColor RedBackgroundColor Black
Write-Host “Please try again or speak to the EUC team if you believe you are authorised”BackgroundColor Black
Write-Host “”
#Call function to get user to try again
Get-UserCredentials
}
}

Function Check-Authentication {
# Attempt to map a drive
# If the drive maps successfully then the user is authenticated
# Map drive using credentials
$Drive = New-PSDriveName LPSProvider FileSystemRoot $SharedDriveToMapCredential $Global:TSCedsErrorAction SilentlyContinue
# Check if drive was mapped successfully
If (($Drive).Nameeq “L”) {
Write-Host “User authentication successful. Proceeding to pre-flight checks…”ForegroundColor GreenBackgroundColor Black
Remove-PSDrive -Name “L”
Start-Sleep 4
# Set the AllowInstall task sequence variable to TRUE
$Global:TSEnv.Value(“AllowInstall”) = $true
}
Else {
Write-Host “Error: Unable to authenticate $($Global:Username.ToUpper())ForegroundColor RedBackgroundColor Black
Write-Host “Please try again…”BackgroundColor Black
Write-Host “”

#Call function to get user to try again
Get-UserCredentials
}
}
Function Check-IsWebServiceOnline {
# Full credit for this function https://gallery.technet.microsoft.com/scriptcenter/Script-to-verify-web-ceb46109
# Create a HTTP request to the Web Service
$Request = [Net.HttpWebRequest]::Create($URI)
#Try to get the response from the Web Service. If a response is received then return true. If some error occurs then return false.
Try {
#Get the response from the request
$Response = [Net.HttpWebResponse]$Request.GetResponse()
return $true
}
Catch {
return $false
}
# Abort the request now
$Request.Abort()
}
########################################################
# Only run this script if the Web Service is online
If (Check-IsWebServiceOnlineeq $true) {
Get-UserCredentials
}
Else {
Write-Warning “Unable to contact the Web Service. Cannot proceed with this script. Please contact the EUC team.”
}

a) Change the variables in lines 12-16 to suit your own set up. This includes the web service URI, the shared drive to map (to authenticate the user against), the name of the Active Directory group and your domain name.

b) If you’d like to prompt for the credentials in the command line instead of a pop up then uncomment line 26.

c) The mapped drive is given the name “L” (for Lockdown). You can change this in lines 95, 98 and 100 if you want.

d) The name of the team to contact should something goes wrong is referred to as the “EUC team”. You can change this to suit your environment in lines 83 and 142.

Create a second shared folder to store the PowerShell script and files

a) Create a folder called “Task Sequence Lockdown” and save the CheckForAuthorisation.ps1 PowerShell script. Give your SCCM network access account share and NTFS permission to this folder. This shared folder should be somewhere in your software sources repository.

b) From a computer/server with MDT installed, copy ServiceUI.exe (from C:\Program Files\Microsoft Deployment Toolkit\Templates\Distribution\Tools\x64) to the “Task Sequence Lockdown” folder from step a) and rename it to ServiceUI_x64.exe

c) Copy ServiceUI.exe (from C:\Program Files\Microsoft Deployment Toolkit\Templates\Distribution\Tools\x86) to the “Task Sequence Lockdown” folder from step a) and rename it to ServiceUI_x86.exe

Configure the Task Sequence

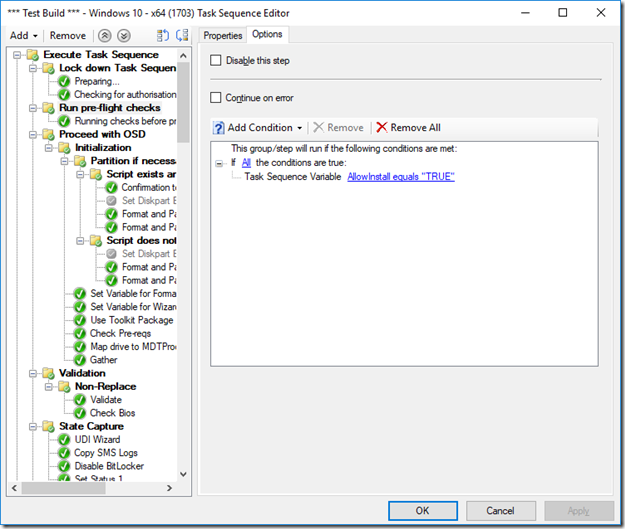
In my case the Task Sequence I want to lock down is called “*** Test Build *** – Windows 10 – x64 (1703)”. Right-click on the task sequence and click on Edit.

a) Under Execute Task Sequence:

Click on Add > New Group. Name it “Lock down Task Sequence”.

b) Click on Add > General > Connect to Network Folder. In the ‘path’ field enter the full path to the “Task Sequence Lockdown” shared folder you created earlier. Important: if this folder and the shared folder to be mapped in the script are both located on the same server then use the IP address of the server in the path field in this step (instead of the hostname).

Optional: I renamed the step to “Preparing…” instead of leaving it the default

Picture1

c) Choose a drive letter. I chose drive letter M. Enter a user account which has permission to map the drive.

d) Click on Add > General > Run Command Line. Enter the following line in step Run Command Line. Include the following line:

M:\ServiceUI_x64.exe -process:TSProgressUI.exe %SYSTEMROOT%\System32\WindowsPowerShell\v1.0\powershell.exe -NoProfile -WindowStyle Hidden -ExecutionPolicy Bypass -File M:\CheckForAuthorization.ps1

Change the drive letter if you chose a different one in the previous step.

image

e) Select the group immediately after the “Lock down Task Sequence” group and click on the Options tab. Click on Add Condition > If statement > All conditions.

Again, click on Add condition > Task Sequence Variable. Enter the variable name “AllowInstall” and the value “TRUE”.

image

If authorisation and authentication is passed then the PowerShell script creates a “AllowInstall” task sequence variable and assigns the value “TRUE”. Therefore, checking for this condition in the next group means installation will not proceed without it. If the PowerShell console window is closed then the Task Sequence will fail.

Suitability of this solution in a live environment

I mentioned at the outset that this solution is intended to keep 2L Engineers from installing a test build. I know there are ways of deploying hidden task sequences but that requires editing the boot image. Personally, I find editing a task sequence simpler.

Also, some university departments have their own IT reps or admins who can be given the go-ahead to install or re-image computers. Because access is controlled via an Active Directory group, giving users that right and removing the right is as simple as adding and removing them from the AD group.

I hope someone, somewhere will find this useful. Remember that the Deployment Web Service by Maik Koster is required for this to work which makes very easy to do checks against an Active Directory domain. If any part of the instructions is not clear do let me know.

Automate the Process of Building and Capturing a Windows 10 1703 Reference Image: Automating using PowerShell

So far in this series we’ve populated our Deployment Share, created a Build and Capture Task Sequence and configured the CustomSettings.ini rules to skip the MDT Deployment Wizard to run our task sequence.

At this point, the CustomSettings.ini rules helps us to automate the process of running the task sequence and capturing the image but there’s still a few manual tasks of having to:

  • Create a Virtual Machine
  • Giving the VM’s network adapter the specific MAC address that we specified in the rules
  • Attaching the MDT Boot Image to the VM’s DVD drive
  • Turning on the VM

Only then does the MDT Deployment Wizard look up the MAC address in the VM and then processes the rules under a matching MAC address section in the CustomSettings.ini file.

So here we need a bit of help from PowerShell and also XML.

Download the zip file containing the PowerShell module and XML file

One of my goals of automating this process using PowerShell was that it should be extensible without having to change any PowerShell code. When Windows 10 1709 comes along later this year I don’t want to have to change anything in the code to account for that. Also, I don’t just create reference images for Windows 10 – I have other reference images to create for Windows 7 and 8.1 (with matching task sequences and rules in MDT). Taking inspiration from Mikael Nystrom’s image factory, I decided to have an XML file to hold data about the Windows reference images I want to create.

The XML file holds global data relating to each VM to create, such as the number of processors, RAM, Hyper-V Switch, ISO path, etc. It also holds data relating to every reference image I want to create, such as the name to give the VM and, most importantly, the Mac address to assign the VM.

This will, I hope, become clearer with an example of how to run the PowerShell function:

New-ReferenceImage –Image windows10-1703 –DestroyVM

Update: Click on the GIF for the high quality image. I didn’t realise WordPress will compress the image so much in the post that the text would be unreadable. Clicking on the image however displays the original high quality GIF.  Powershell 3

The value you provide in the –Image switch has to match a tag in the XML file (which is where the module gets its data from). PowerShell will match the value provided in the –Image switch with an <Image> tag in the XML file and then proceed to create the VM with the name and Mac address within the matching tag.

In the above example, this is how things work:

  1. PowerShell matches the value provided in –Image switch (windows10-1703) with the tag highlighted yellow below
  2. It creates a VM called “Reference Image – Windows 10 1703”
  3. Give the network adapter the MAC address 00:15:5D:00:0B:04. This is the same MAC address we have in our CustomSettings.ini rules.
  4. The MDT boot image is attached to the VM
  5. The VM fires up to boot straight into the MDT Deployment Wizard.
  6. The Deployment Wizard then looks up the VM’s MAC address and matches it with the MAC address provided in the CustomSettings.ini rules.
  7. The rules underneath the MAC address tells the Deployment Wizard to run our Build and Capture Task Sequence and create a captured WIM file at the end

Continue reading

Quick Fix: Get-MDTComputer by Description Broken in the MDT PowerShell Module

The short story:

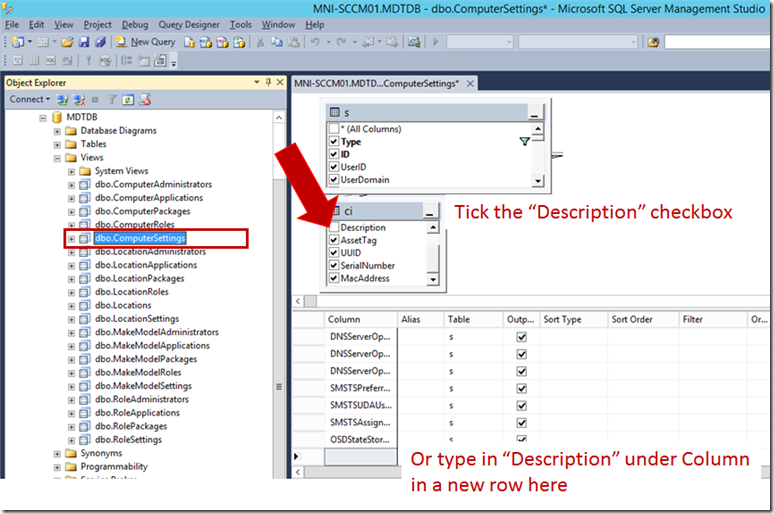
Launch SQL Server Management Studio, expand the MDT database > Views > right-click on dbo.ComputerSettings and click on “Design”, tick the “Description” column in the CI table in the View.

The long story:

During my experiments with using PowerShell to automate Windows imaging and deployment tasks I’ve been working with the MDT database module, provided by Michael Niehaus from Microsoft.

I was disappointed to find the Get-MDTComputer cmdlet is broken somewhat, as in you can’t retrieve a computer record from the database matching a description. This is what the error message says when you try:

image

I thought I’d take a look at the Get-MDTComputer function in the PowerShell module and saw that the function was doing nothing more than building a SQL statement and querying the MDT database. Specifically, it was querying the “ComputerSettings” table as shown below:

image

This, along with the error message we saw earlier mentioning “Invalid column name ‘Description'”, led me to fire up the SQL Server Management Studio to examine the “ComputerSettings” table, only to find there isn’t a table with that name but there was a “View” called “ComputerSettings”.

I right-clicked the “ComputerSettings” View and selected “Design” and immediately saw what the issue was here. It was apparent that the problem was that the “ComputerSettings” View didn’t include the “Description” column from the ComputerIdentity table.

So the solution is to tick the checkbox next to the “Description” column in the CI table in the View:

image


And here you can see the Get-MDTComputer cmdlet working with the –Description parameter:

image