OpenVPN Cloud Endpoint Testing

So in the last post we stopped at the point of creating additional users who you want to give VPN access to. I also explained that the connection from the RRAS server to the OpenVPN Cloud counts as 1 out of 3 connections so you are left with two connections for your endpoints/users.

Now let’s get the connector installed on our endpoint device and our users connected.

Just a quick reminder that the portal address is “youropenvpncloudId.openvpn.com”

1) Log into your OpenVPN web portal and add your end users. Note that the email address here must be valid for this to work. Since this is intended for lab use just enter your own for testing.

image_thumb[10]

2) Build a VM with Windows 10 installed. The virtual network adapter must be connected to the Internal switch to join the domain and verify you can ping the domain and maybe access a file share or something.

3) Now change the virtual network adapter so it’s bound to the External switch instead to simulate offsite access. Verify that you cannot ping the domain.

4) On this VM log into the email address you provided for the user which has instructions on how to install the connector app. It’s just a standard MSI so go ahead and install it.

image

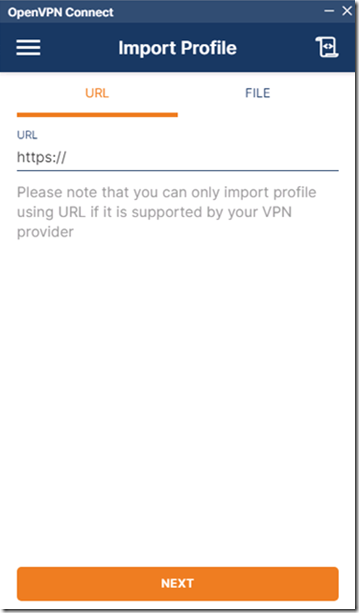
5) Open the connector app and enter your OpenVPN Cloud portal URL.

image

Sign in with the user account ID you created earlier.

Choose your Region and click Connect. It should only take a few seconds to establish the VPN connection.

image

Verify that you can ping your domain and access file shares.

You can, of course, install the endpoint connector on a physical domain-joined laptop and connect to your Wi-Fi (assuming your lab is on a Internal/Private network) to test this.

In the next post I will go through instructions on how to enable Azure SSO so you don’t have to manually create the user accounts in the portal and better simulate a production environment.

Split Tunnel VPN with OpenVPN Cloud

I wanted to set up VPN split tunnelling for my home lab to simulate my workplace (which uses a commercial VPN solution ) to build a proof of concept of Windows AutoPilot with on-premise domain access from Azure AD joined devices.

I came across OpenVPN Cloud which provides you with 3 connections for free/personal use.

A couple of notes on my setup:

My host server has one Internal switch and one External switch. I installed RRAS on a Windows server VM in my lab running Windows Server 2016 with two virtual network adapters, one connected to the Internal switch and the other on the External switch. Both have DHCP enabled. Now for the instructions:

1) Install RRAS on a Windows server box (mine is on Windows Server 2016) with two virtual network adapters as mentioned above.

2) Enable routing on the server and follow the rest of these instructions on this RRAS server

3) Sign up for a free personal account and create your OpenVPN ID.

image

3) Once logged in, click on Networks on the left and and select “Remote Access” and follow the rest of the wizard.

image

Give your network a name.

Give the connector a name and select your region. This is the RRAS server on which you will have a OpenVPN connector (agent) running.

Add your lab subnet under Private Subnets.

4) Next select where to deploy the connector. I chose Windows, downloaded the connector and installed it on my RRAS server mentioned above.

5) Open the OpenVPN Connector on the RRAS server, sign in with the user account/email address you signed up with and you should see a connection established.

image

Back on the OpenVPN web portal click Next and wait for the connection to be shown as established on that end too.

6) Next add your internal DNS to the web portal.

image

7) Click on Users and add a second user. This is the user who will be signing into VPN from an endpoint device over WAN/off-site. You can, of course, create more users here if you wish.

image

This completes the setup of the OpenVPN Cloud on the server side. I will soon write a follow up post on how to get endpoint devices connected via VPN.

Note that the connector which you installed on the RRAS server and the connection that it established with OpenVPN Cloud is counted as 1 of the 3 free connections you get with the free account. So you actually have only two connections for your endpoint devices. However, for quick POCs and lab use this is more than enough.

What I’ve Been Up To During My Blogging Hiatus

It’s been a long time since I’ve updated my blog though I do have a very good reason for that. I wanted to spend more time experimenting and learning new skills and technology in my lab. I’ve found having to plan and write blog posts not only get in the way of making progress in the lab but also more of a challenge than getting to grips with new technology. Hence the sabbatical.

I’m please to say my time in the lab has been spent well indeed. Here’s the kind of stuff I’ve been getting up to:

Hyper-V 2012 R2 and Windows Server 2012 R2

I’ve always been interested in virtualization and have used and learned a lot with VMware vSphere ESXi 5.0 running on a HP Microserver from about three years ago. Having heard a lot about Hyper-V catching up with vSphere ESXi in terms of features (and being a Microsoft fanboy at heartJ) I was eager to check out its competitor from Microsoft. I bought two additional servers for my lab (both Lenovo ThinkServer TS140) to help me learn Hyper-V. I’ve had much fun with Hyper-v and Server 2012 R2 over the past year while experimenting with the likes of SMB 3.0, iSCSI direct, NIC teaming, Storage Spaces and backup solutions such as Veeam and Altaro. Oh, and live VM migration! I’ll be writing a post to document my lab set up just to illustrate how it’s evolved since I last documented it in My Lab at Home. Also coming up are posts on the work I’ve been doing as mentioned above – most of these will be How To articles for my own reference (and anyone to consult should they wish to do so).

SCCM 2012 R2

I started with Windows Deployment Toolkit 2010 three years ago but I always had my eye on SCCM and Zero Touch deployment. Having set up Hyper-V in my lab it wasn’t long before I had my SCCM server up and running on a virtual machine. Again, I’ll be writing about my work on application deployment (including application packaging), operating system deployment and reporting in particular.

Windows 10

The latest (and greatest?) Windows operating system from Microsoft may have RTM’d only eight weeks ago but I’m happy to say I have almost a year’s experience of using the OS already. I’ve been a Windows Insider since day one and have used every single insider build that’s been released (I skipped the leaked builds) on my daily computer. I have a lot to say about Windows 10 (mostly good), though I’m not sure how much I’ll end up writing about it here.

With an update on what I’ve been doing out of the way I can now make a start on writing a few posts.

PS.

I want to mention a few people who I follow on Twitter who have helped me a lot in getting to grips with some of the technology I’ve been working with. As technology evangelists these people invest a lot of time in sharing their knowledge with the greater tech community. Notable among them are:

Niall C. BradyMikael NystromJohan ArwidmarkAnoop C Nair, and Alan Burchill.

My Lab at Home

I’ve always felt there was something about the Lab that didn’t sit quite right with me which held me back from writing this post sooner. Investing in a HP MicroServer recently was a good move and having it set up as my vSphere host has definitely set things right in my eyes. I quite like my current set-up now.

I’ve mentioned my lab quite a few times on my blog but this is the first time I go into detail on its set-up. So here it goes…

I have VMware vSphere 5.0 running on my vSphere host as my hypervisor which currently has two guest Virtual Machines – Windows Server 2008 R2 and Ubuntu 11.10. I have an Active Directory domain set up on the Windows Server along with a Windows 7 deployment environment with MDT 2012 and Windows Deployment Services. On Ubuntu I have a FOG server (a Linux-based cloning solution) up and running which is mainly used for disaster recovery and backups (useful for image building in deployment scenarios as well as for personal use).

image

With regards to physical machines I have a Windows 8 PC which I use to administer the vSphere host using vSphere Client and for connecting to the Windows Server and Ubuntu VMs using Remote Desktop. There are also two spare computers in the lab for testing purposes, either for Windows 7 deployment or as client PC’s in my Active Directory domain.

Continue reading

Setting up my Deployment Lab

UPDATE: This post is outdated. Check out the new Lab here.

To get my learning project off to a good start I made a couple of investments to set up a lab at home – a technician computer, a reference computer and a target computer along with the FOG server.

With my limited budget in mind I took the decision to dual boot my HP DC5800 to act both as my ‘Technician Computer’ and ‘Reference Computer’. With the WAIK installed on the technician computer, it’ll be used to build the unattend.xml answer file using the Windows SIM tool as well as using Fog’s web management interface and continuing with my on-going research into the subject, etc.

I was lucky to find a second HP DC5800 on eBay identical to the one I’ve had for over a year to act as my target computer and also bought a 4-port KVM switch allowing me to control 4 computers with a single keyboard, mouse and monitor to minimise the space my deployment lab takes up (in my bedroom :).

Note that I made sure the technician computer and reference computer are both on two separate disks – if you have a single disk with multiple partitions you can’t choose to upload just one of these using Fog, you can only upload the entire disk. Also, when Fog deploys an image to a computer with two disks it does so on the first available disk, which is why I’ve also made sure the reference computer installation is on the first disk.

Now I’m ready to get started!