Dual Scan: The Undesirable Windows 10 Update Behaviour

The Windows 10 estate in our environment consists primarily of v1511 and v1607. All new computers (and any being re-imaged) get Windows 10 1607 installed, which is our ‘Production’ build. We have Windows 10 updates deployed to the All Unknown Computers collection which ensures that updates are installed during OSD. This is Windows 10 “Security Updates” and “Critical Updates” only and does NOT include feature updates.

The End User Computing team are yet to green light Windows 10 1703 hence the 1703 feature update has not been approved in the Windows 10 Servicing plans. However, we noticed recently that 2L Engineers click on “Check for updates” AFTER build has completed and not only are there additional updates to install but the Windows 10 1703 feature update get installed too. Now, this is interesting because, like I said, the feature update hasn’t been approved in the Windows 10 servicing plans. (Note, I’m specifically referring to the ‘Check for updates’ button and not the “Check online for updates from Microsoft Update” link.)

Now, I’ve done a lot of testing and reproduced the issue in my lab and confirmed the culprit was Dual Scan. Enabling certain Windows Update for Business (WUfB) group policy settings (or Registry or MDM settings) triggers the Dual Scan behaviour which scans both internal WSUS or SCCM SUP servers as well as Microsoft Update servers for patches and feature updates. Annoyingly, it ignores the local WSUS or SUP servers and gives precedence to Windows Update. This is exactly what was happening in our environment. Consider the following screenshot of WindowsUpdate.log from a newly installed Windows 10 1607 device after having clicked on the Check for updates button and installed the feature update. It confirms Windows 10 is reaching out to Microsoft Update servers:

Picture1

So what actually triggered the Dual Scan behaviour? Generally speaking, using certain group policy settings related to WUfB enables Dual Scan. Microsoft mentions some of these settings in “Using ConfigMgr With Windows 10 WUfB Deferral Policies”. In our environment we had the Specify intranet Microsoft update service location setting set to our internal SUP server. In “Manage settings for software updates” Microsoft recommends that this setting should not be enabled using Group Policy because the machine policy received from SCCM will populate this setting in the local policy on the client computer and point to the SUP servers. Having the policy set using Group Policy in addition to the local policy being enabled by SCCM causes undesirable side effects, one of which is Dual Scan.

How do we stop this happening? For Windows 10 607 you will need to install the August cumulative update (or better yet KB4039396). For Windows 10 1703 you will need the October cumulative update installed. Then you will need to install the latest Windows 10 1709 administrative templates which includes a setting called “Do not allow update deferral policies to cause scans against Windows update” which will disable the Dual Scan behaviour. It’s important to note that simply updating the administrative templates will not be enough. You need the above cumulative updates/KB’s installed to be able to take advantage of the new group policy setting to disable Dual Scan.

After having taken the above actions in my lab I carried out further testing and found no additional updates, feature updates or otherwise, were available to install after OSD completed, thereby disabling Dual Scan successfully.

Adding Network (and Storage) Drivers to Boot Images in SCCM

Having written a post on Obtaining and Importing Drivers in SCCM for HP Client Devices it seems only fitting to follow it up with a post on adding drivers to boot images in SCCM. So here goes.

For this post I will add the driver for the StarTech USB-C to Gigabit Network Adapter (product id US1GC30B) to my boot image.

clip_image001

Although I have the drivers on a driver CD that came with the adapter I wanted to go ahead and look for a more up-to-date driver. I first had a look on the StarTech website for the drivers which told me a) the original chipset manufacturer (Realtek) and b) the chipset model (RTL8153). Armed with this information I then had a look on the Realtek website an immediately found a more up to date driver (10.13 vs 10.10). As I explained in my previous post, you almost always find the latest drivers from the original chipset manufacturer.

If you already have the driver imported in SCCM

Before going ahead with the step-by-step instructions, if you’ve already got the driver imported into SCCM then all you need to do is to go into the Properties of the boot image and add the drivers in the Drivers tab:

clip_image002

Continue reading

Configure your Task Sequence to Install Driver Packages for Client Devices

This is a continuation of  my post Obtaining and Importing Drivers in SCCM for HP Client Devices where we obtained drivers for our reference HP EliteBook 820 G3 laptop, imported them into the SCCM database, created a driver package and distributed the package to our Distribution Points.

Before carrying on with the instructions here please make sure you have the exact model name of your laptop as reported by WMI. We covered this under “Get the Correct Model Name of the Client Device” in the previous post. (Run “WMIC csproduct GET name” in a command prompt on your client device and make a note of the model name *exactly* as shown.)

As I explained in the previous post the idea is to configure our task task sequence to only install this driver package for this particular model. That’s where the model name comes into the picture. Any typos in the model name will cause the task sequence to skip this driver package from being installed during OSD.

Instructions for MDT Task Sequence

Locate the “Auto Apply Drivers” step under Post Install and disable it.

Add a group under Post Install called Install Drivers

Add a group under Install Drivers called HP

Under HP add an “Apply Driver Package” step, give it a name and choose the driver package you just created

Check “Do unattended installation of unsigned drivers on versions of Windows where this is allowed”

You should have something like this:

clip_image013

Select the HP group and add the following rules in the Options tab:

clip_image015

Select the HP EliteBook 820 G3 step and add the following rules in the Options tab:

clip_image017

This is where you’ll need the model name of the laptop which we obtained using a WMIC query earlier in the post (under Get the Correct Model Name of the Client Device).

Instructions for SCCM Task Sequence

For your SCCM task sequence locate the “Apply Device Drivers” step and disable it.

Add a group under Post Install called Install Drivers

Add a group under Install Drivers called HP

Under HP add an “Apply Driver Package” step, give it a name and choose the driver package you just created

Check “Do unattended installation of unsigned drivers on versions of Windows where this is allowed”

You should have something like this:

clip_image019

Select the HP group and add the following rules in the Options tab:

Add an If statement and choose Any

Add the following WMI Queries

SELECT * FROM Win32_ComputerSystem WHERE Manufacturer LIKE “HP”
SELECT * FROM Win32_ComputerSystem WHERE Manufacturer LIKE “Hewlett Packard%”

Select the HP EliteBook 820 G3 step and add the following rules in the Options tab:

SELECT * FROM Win32_ComputerSystem WHERE Model LIKE “HP EliteBook 820 G3”

Test your Task Sequence

At this point you’ve got everything set up. Go head and test your task sequence. Hopefully you won’t have any  exclamation marks in Device Manager.


Obtaining and Importing Drivers in SCCM for HP Client Devices

I quickly found while using the HP Client Integration Kit that, though the tool makes it easy to download and import drivers, the size of the resulting drivers and packages is excessively big. Using the HP EliteBook 820 G3 as an example device, when using the HP CIK the resulting size of the drivers is 2.3GB for this laptop compared to 823MB using the method I’ll describe in this post.

In this post we will:

  • Obtain the drivers for our device
  • Import the drivers into SCCM and create a driver package
  • Configure a task sequence to install the driver package
  • Set rules in the task sequence to only install this driver package on HP EliteBook 820 G3 laptops

I will assume you already have a Task Sequence created to build your Windows computer.

Obtaining the Drivers

I use the 820 G3 as an example here but you can adapt this for any make and model. This is a hands-on method of obtaining drivers which does take a little time but I’ve found this gives me the best result during OSD and less driver bloat.

1) Install HP Support Assistant and install any driver updates on your client device

2) Install Intel Driver Update Utility and install any updated drivers, if available

3) (Optional) Install drivers from third party manufacturers.

This step is more manual so will take some time which is why I’ve marked it as optional. This is preferable if you want to make sure you want to start off with the latest drivers for your devices in your SCCM database.

Open up Device Manager and identify devices from third party manufacturers like Broadcom, AMD, Realtek, etc. Go to each of their website and check if there’s a more recent driver available and install them.

4) Backup your installed drivers using Double Driver.

Double Driver basically scans your current system, identifies your device drivers and backs them up for you which you can then use with SCCM. I’ve been using Double Driver for a few years now but didn’t think of using this with SCCM until very recently.

Download the portable tool and run it on your client device. Click on Backup > Scan Current System and wait for the tool to identify your device drivers.

Here is a screenshot of the drivers identified on the HP EliteBook 820 G3:

clip_image004

Click on “Backup Now” and choose a destination to store your drivers. Make sure you leave the “Structured folder (default)” selected. Click on OK

clip_image005

Keep the resulting backup drivers handy to be imported into your SCCM database

Get the Correct Model Name of the Client Device

Further along in this post we’ll create a driver package for our drivers which we’ll then use in our task sequence. We’ll need to create a rule in our task sequence to only install this driver package for this particular computer model. For this reason we’ll need to extract the correct model name of this device at this stage using the following WMI query in an elevated command prompt:

WMIC csproduct GET name

clip_image007

Make a note of the result exactly as shown and keep it safe. We’ll need it further along in the post.

Create Source Folders for your Device Drivers and Driver Package

Note that before importing the drivers you need a source folder for your device drivers and a separate folder for your driver package. I always stress the importance of organising the SCCM software repository with a clear and easily identifiable folder structure to better manage your packages (or drivers in this case). Create a folder structure for your client device driver management similar to below:

Source folder for device drivers:

\\sccmserver\Source\OSD\Drivers\Device Drivers\HP\Windows 10 x64\EliteBook 820 G3

Source folder for driver packages:

\\sccmserver\Source\OSD\Drivers\Driver Packages HP\Windows 10 x64\EliteBook 820 G3

2) Copy the drivers you backed up using Double Driver into the source folder for device drivers similar to above.

Import the Drivers in SCCM and Create a Driver Package

1) Open up the SCCM console and select the Software Library workspace. Expand Operating Systems and select Drivers. Click on “Import Driver” in the ribbon

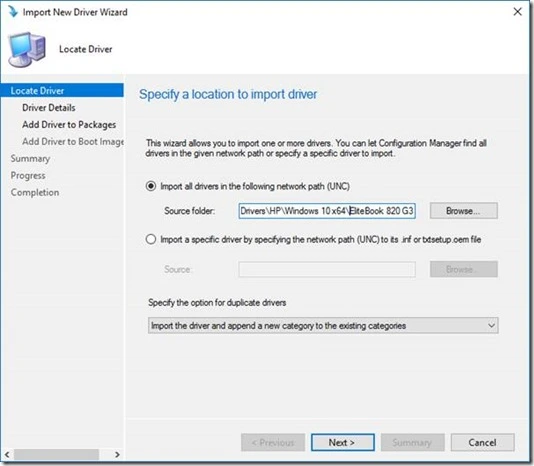
2) In the Import New Driver Wizard leave the first option selected and enter or browse to the UNC path where you copied your device drivers. In my case it’s \\sccmserver\Source\OSD\Drivers\Device Drivers\HP\Windows 10 x64\EliteBook 820 G3

Under “Specify the option for duplicate drivers” choose

clip_image009

3) Driver Details page:

Uncheck “Hide drivers that are not in a storage or network class (for boot images)”

Uncheck “Hide drivers that are not digitally signed”

Check “Enable these drivers and allow computers to install them”

Click on Categories and either select an existing category to add these drivers to or create a new category.

clip_image011

4) In the Add Drivers to Packages step we’ll create a new driver package HP EliteBook 820 G3

For the name of the package I suggest you enter a name which identifies the model of the computer and the OS and architecture the driver package is intended for.

Something like HP EliteBook 820 G3 – Windows 10 x64

Under “Path” enter or browse to the source folder you created for the driver package. In my case it’s \\sccmserver\Source\OSD\Drivers\Driver Packages HP\Windows 10 x64\EliteBook 820 G3

Finish the rest of the wizard without making any changes to the defaults (do not add any drivers to any boot images when asked).

Distribute the Driver Package to your Distribution Points

Go ahead and distribute the driver package to your DPs.

You may also want to create a folder structure in your SCCM console under Driver Packages and move your package to it. Something like Driver Packages\Windows 10 x64

Configure your Task Sequence to Install the Driver Package

I noticed this post is quite long so I’ve split it into two and moved this section into it’s own post titled Configure your Task Sequence to Install the Driver Package. You can continue with the rest of the instructions over there.


Applying an Unattend.xml Answer File in a SCCM OSD Task Sequence

There are times when you might need to customize Windows by using an unattend.xml answer file during the OS deployment. Yes, many of these customizations can be baked into the OS image itself or scripted but using an answer file is easier in many situations. For example, if you had offices in UK and USA and wanted to customize the keyboard language depending on the location, then it’s easier to maintain two answer files than two OS images.

Once you create an answer file how do you use it in a OSD task sequence? Long story short, you create a package for the answer file and then reference it in the Apply Operating System step in the task sequence.

Read on if you want the long story…

1) Create a Package for the Answer File

First thing’s first, copy the unattend.xml answer file into the SCCM software repository. Make a note of the answer file name and the UNC path where it’s stored.  Continue reading

Deploying the Reference Windows 10 Image using SCCM 2012 R2 (SP1)

This is the final part of a three-part series on Windows 10 OSD using MDT and SCCM 2012 R2.

Recap: In the first post we built our reference image using MDT and customized our default profile. In the second post we created our unattended answer file and captured our reference image.

Here, we’ll start off with importing our reference image into SCCM and then creating our task sequence to deploy the image. We’ll then create a package for our unattend.xml answer file to be used in our task sequence.

I’m going to assume you already have SCCM up and running and have access to your SCCM software repository.

Step 1) Import the Windows 10 Reference Image into SCCM

1.1) Copy the Reference Image to the SCCM Software Repository

We left the previous post after having captured the image using MDT, which saved the image into the “Captures” folder inside the MDT deployment share root.

Before importing the image into SCCM we have to copy/move the image to the SCCM software repository.

In my case I have a folder called “Sources” where I store all my software, packages, and images relating to SCCM. I suggest organizing the software repository with a clear folder structure. My folder structure for storing OS images looks like this:

clip_image002

You may have a different folder structure – what matters is that it should be organized so you it’s easier to locate everything.

1.2) Import the Image into SCCM

Your Software Library workspace should equally be organized with a clear folder structure. Continue reading

Windows 10 OSD Error: Windows Could Not Finish Configuring The System

I’ve been racking my brains over this one for the past couple of days so I thought I’d chalk up my findings here in the hope of saving the headache for somebody else.

I came across this very unexpected error message when my VM rebooted right after the Apply Operating System action while running a task sequence to install a custom Windows 10 image with an answer file:

clip_image002

(I was too busy troubleshooting the problem and didn’t think of taking a screenshot until it was too late. I had to Google the error message to find this image for the purposes of this post.)

Long story short, the clue to resolving this lies in the setuperr.log file in the C:\Windows\Panther\UnattendGC directory. Continue reading

Capturing the Reference Windows 10 Image using MDT 2013 Update 2

This is the second of a three-part series on Windows 10 OSD using MDT and SCCM.

Recap: In the first post we populated our MDT deployment share and then created and ran a task sequence to install Windows 10 on a virtual machine along with our applications and the .NET Framework 3.5 enabled. We left the post at the point of having a Windows 10 installation which we can brand as our own and customize the default user profile.

Here, we’re going to pick up from where we left off – I’m going to assume you’ve done all the customization to your liking and thus effectively turning the Windows 10 virtual machine into a reference machine. We’ll create a task sequence to sysprep and capture an image of our virtual machine which will give us our “Reference Windows 10 Image”. We’ll also create the unattend.xml file in this post which we’ll need in the next post. Ok, let’s get started.

Step 1) Create Task Sequence to Capture the Windows 10 Reference Image Continue reading

Building a Reference Windows 10 Image Using MDT 2013 Update 2

This is the first of a three-part series on Windows 10 OSD using MDT and SCCM.

I’m using the Windows 10 Enterprise 64-bit 1511 ISO and MDT 2013 Update 2 for this post. I’m going to assume you already have your MDT build environment up and running and have access to the Windows 10 installation ISO as well as any applications you wish to add to your reference image.

Here’s a quick overview of how this will work:

  • We’ll start off with a blank/vanilla Windows 10 ISO which we’ll import into MDT
  • We’ll also add our applications to MDT
  • We’ll then create a task sequence instructing it to first install this blank/vanilla Windows 10 and then install our applications and also enable .NET Framework 3.5 feature
  • We then run this task sequence on a virtual machine which will leave us with a Windows 10 installation (with our applications installed and .NET Framework 3.5 enabled)
  • We customize Windows, customize the default user profile and effectively turn it into a Reference Virtual Machine

(The next post will cover creating a task sequence to capture this reference machine image and creating an unattend.xml answer file. Running this task sequence on the Reference Virtual Machine will capture an image of our customized Windows 10 and leave us with a “Reference Windows 10 Image”. The final post in the series will cover using SCCM to deploy our “Reference Image” onto a computer)

Step 1) Populating the MDT Deployment Share

Before we can build our reference image we need to populate our deployment share in MDT by importing the Windows 10 media and adding applications.  Continue reading

New Series of Posts on Windows 10 OSD Using MDT and SCCM

It’s been pretty dry here on my blog with no new content for quite some time now (since I’ve been spending more time learning and experimenting than writing). I’d therefore like to make some headway by starting a series of posts on building a Windows 10 reference image, capturing the image, building an unattend.xml answer file and then using the answer file to deploy the captured image using SCCM.

Side note: I’ve been debating for quite some time now whether the Internet needs yet another series of How-To guides on this subject. But then I received this comment on my blog which spurred me into action.

clip_image002

I wish you left your name, cos this one’s for you.

Here’s a list of posts I have planned for this series along with some info on what each post will cover:

Part 1 – Building a Reference Windows 10 Image Using MDT 2013 Update 2

  • Here we’ll Import the source Windows 10 media into the MDT deployment share and also add our applications. We’ll then create a task sequence to build our Windows 10 image (this will include instructing the task sequence which OS we want to build, what applications we want to install and what Windows features we want to enable)
  • We’ll run our task sequence to install our Windows 10 image onto a Virtual Machine and then customize the Windows 10 and the default user profile to turn this into what we’ll call a Reference Virtual Machine

Part 2 – Capturing the Windows 10 Reference Image Using MDT

  • Creating a task sequence to sysprep and capture our Reference Virtual Machine image
  • Building our unattend.xml answer file
  • Running the sysprep and capture task sequence on our Reference Virtual Machine which will leave us with a Reference Image

Part 3 – Deploying the Windows 10 Reference Image using SCCM

  • Importing the Reference Image into SCCM
  • Creating a task sequence to deploy the reference image
  • Creating a package containing the unattend.xml answer file and editing the task sequence to apply the answer file package when deploying the reference image
  • Testing the deployment on a physical computer