How I Went from MDT Integrated Task Sequence to Native SCCM

I started a new job six months ago as a EUC/SCCM Engineer where, after having delivered a couple of high profile objectives, one of the goals I have set myself is to combine 3 task sequences into one and to simplify the resulting Task Sequence.

I initially considered dumping the MDT integrated Task Sequence and going native SCCM, favouring the clean and simplified layout of the native TS in comparison to the MDT integrated one. But after a little deliberation I dismissed the idea since I was hoping to spin up a MDT database to make the Task Sequence and the build process truly dynamic, plus I really liked having all those extra task sequence variables that comes with MDT.

But then Gary Blok (from garytown.com) tweeted that he had moved away from MDT integrated to native SCCM and I was swayed again by his clean all-native task sequence. He even provided instructions on how to create a “MDT Lite” package which gave you access to all the additional task sequence variables without all the bloat.

So, taking inspiration from Gary I decided to go native SCCM.

In my MDT integrated task sequence I have all my PowerShell scripts in a folder called “ZTICustomScripts” which sits in the Scripts folder in the MDT Toolkit Files package. That way I can call the script by referencing the “%SCRIPTROOT%” variable, like below:

clip_image002

I knew that if I wanted to move to native SCCM task sequence then I will need to be able to still reference the “%SCRIPTROOT%” variable, which would mean I can copy and paste these steps from one TS to another.

I followed Gary’s blog post to create my MDT Lite package, except for copying the BGInfo files since I use the excellent OSD Background tool instead. Of course, I also added my ZTICustomScripts folder which contains all my PowerShell scripts:

image

I created a package called MDT Lite with the above contents. This is how I used it in my new all-native Task Sequence:

Created a group called “Download MDT Lite” right after the partitioning steps.

Added a “Download Package Content” task and called it “Download MDT Lite Package”. I selected the MDT Lite package I created and set the download location to “Task Sequence working directory”. I checked “Save path as a variable” and chose “MDTLite” as the variable name.

image

Note that to be able to reference the contents of this package we have to append “01” to the name of the variable, thus “MDTLite01”. (If we had a second package to download in the list then that package location would be referenced as “MDTLite02”.)

I can now reference the Scripts folder within this package as “%MDTLite01%\Scripts”, but that would mean updating each and every one of my Run Command Line steps with the new path which is something I did not want to do. So I set my own custom task sequence variable called “SCRIPTROOT” and set its value to “%MDTLite01%\Scripts”, shown below:

image

This meant that I can just copy and paste my Run Command Line steps (which run my PowerShell scripts) to the new native task sequence with very little to no changes. I can also create a nested Task Sequence with all the steps to run my scripts which I can use in the MDT integrated TS and the native TS which has not gone into production just yet (and thus avoid duplication of efforts).

Lastly I done the same for the %ToolRoot% variable as well.

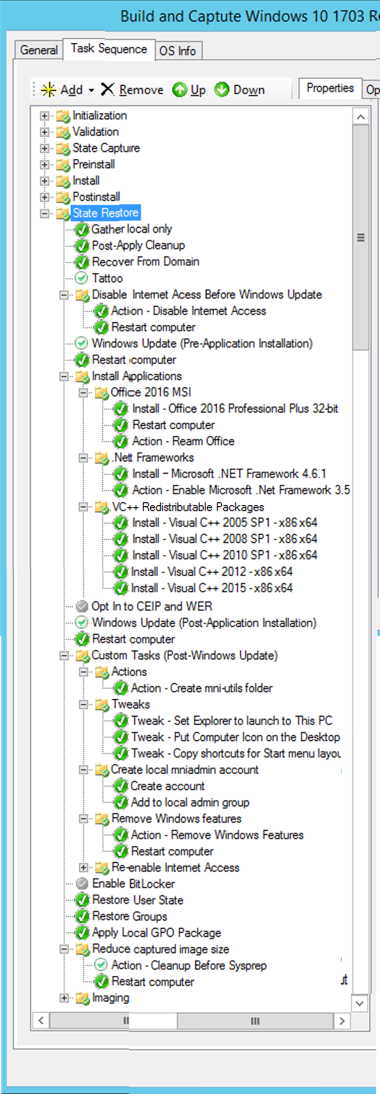
The resulting task sequence is a lot leaner and much easier to take in.

Extending the MDT Database – sp_refreshview Not Working

I recently had to add a few custom properties to the computer settings in the MDT database and discovered the custom properties weren’t being read using PowerShell or during a deployment simulation. A quick look into the MDT database on the SQL server revealed this was due to the database Views not being updated with the new settings, despite running the recommended stored procedures using sp_refreshview.

In this post we’ll take a look at how to extend the database with your custom properties, the issue I experienced and the resolution.

A Quick “How To” on Adding Your Own Custom Properties

Launch SQL Server Management Studio and connect to your SQL server, expand the MDT database > Tables > File Tables > dbo.Settings > right-click on Columns and select New Column. Add your properties in the Column field like so:

pic1

Once you’ve added your custom properties, it is recommended to run the following queries against the MDT database:

EXECUTE sp_refreshview ‘[dbo].[ComputerSettings]’
EXECUTE sp_refreshview ‘[dbo].[LocationSettings]’
EXECUTE sp_refreshview ‘[dbo].[MakeModelSettings]’
EXECUTE sp_refreshview ‘[dbo].[RoleSettings]’

If you then launch the Deployment Workbench you will find the new properties in the Details tab for any given Computer or Role.

The Problem

For testing purposes I configured a couple of the new properties as shown below:

image

However, when I tried to retrieve the properties using PowerShell the properties were missing:

image

Digging into the database on the SQL server revealed the “ComputerSettings” and “RoleSettings” Views haven’t been updated despite running the sp_refreshview stored procedures. The properties were missing from the Views entirely as shown below:

pic2

 The Resolution

A “View” is simply a collection of properties/columns from multiple tables in a database. The cmdlets in the MDTDB PowerShell module such as Get-MDTComputer and also the Gather step in MDT runs a query against these Views to retrieve computer properties. An incomplete View = broken OSD :).

Fortunately fixing the offending Views are quite simple.

In the SQL Server Management Studio and expand the MDT database > Views > right-click on “dbo.ComputerSettings” and choose “Script VIEW as” > Alter To > New Query Editor Window.

In the resulting SQL query simply add your custom properties at the end of the SELECT statement as shown below:

image

Once this is done, you can repeat this process for the views “RoleSettings”, “LocationSettings” and “MakeModelSettings”. In my case only the views “ComputerSettings” and “RoleSettings” needed updating.

Once complete right-click on your MDT database and click Refresh.

Now when I run Get-MDTComputer the properties are being returned just fine:

image


Automate the Process of Building and Capturing a Windows 10 1703 Reference Image: Automating using PowerShell

So far in this series we’ve populated our Deployment Share, created a Build and Capture Task Sequence and configured the CustomSettings.ini rules to skip the MDT Deployment Wizard to run our task sequence.

At this point, the CustomSettings.ini rules helps us to automate the process of running the task sequence and capturing the image but there’s still a few manual tasks of having to:

  • Create a Virtual Machine
  • Giving the VM’s network adapter the specific MAC address that we specified in the rules
  • Attaching the MDT Boot Image to the VM’s DVD drive
  • Turning on the VM

Only then does the MDT Deployment Wizard look up the MAC address in the VM and then processes the rules under a matching MAC address section in the CustomSettings.ini file.

So here we need a bit of help from PowerShell and also XML.

Download the zip file containing the PowerShell module and XML file

One of my goals of automating this process using PowerShell was that it should be extensible without having to change any PowerShell code. When Windows 10 1709 comes along later this year I don’t want to have to change anything in the code to account for that. Also, I don’t just create reference images for Windows 10 – I have other reference images to create for Windows 7 and 8.1 (with matching task sequences and rules in MDT). Taking inspiration from Mikael Nystrom’s image factory, I decided to have an XML file to hold data about the Windows reference images I want to create.

The XML file holds global data relating to each VM to create, such as the number of processors, RAM, Hyper-V Switch, ISO path, etc. It also holds data relating to every reference image I want to create, such as the name to give the VM and, most importantly, the Mac address to assign the VM.

This will, I hope, become clearer with an example of how to run the PowerShell function:

New-ReferenceImage –Image windows10-1703 –DestroyVM

Update: Click on the GIF for the high quality image. I didn’t realise WordPress will compress the image so much in the post that the text would be unreadable. Clicking on the image however displays the original high quality GIF.  Powershell 3

The value you provide in the –Image switch has to match a tag in the XML file (which is where the module gets its data from). PowerShell will match the value provided in the –Image switch with an <Image> tag in the XML file and then proceed to create the VM with the name and Mac address within the matching tag.

In the above example, this is how things work:

  1. PowerShell matches the value provided in –Image switch (windows10-1703) with the tag highlighted yellow below
  2. It creates a VM called “Reference Image – Windows 10 1703”
  3. Give the network adapter the MAC address 00:15:5D:00:0B:04. This is the same MAC address we have in our CustomSettings.ini rules.
  4. The MDT boot image is attached to the VM
  5. The VM fires up to boot straight into the MDT Deployment Wizard.
  6. The Deployment Wizard then looks up the VM’s MAC address and matches it with the MAC address provided in the CustomSettings.ini rules.
  7. The rules underneath the MAC address tells the Deployment Wizard to run our Build and Capture Task Sequence and create a captured WIM file at the end

Continue reading

Automate the Process of Building and Capturing a Windows 10 1703 Reference Image: The CustomSettings.ini Rules

We left the previous post in this series after having created our build and capture task sequence and having generated a boot image ISO.

As I explained in the post, to build and capture our reference image you will use the boot image ISO to fire up a virtual machine into the MDT Deployment Wizard where you go through a number of wizard panes. This is normally a manual process where you have to enter the keyboard language, region, time zone, etc and select the task sequence to run and whether you want to capture an image.

This post is all about eliminating this manual process with the help of the CustomSettings.ini rules which essentially providing answers to the wizard panes and thereby skipping this step altogether.

Set the Customsettings.ini Rules

To configure your rules right-click on your deployment share in the Deployment Workbench and select Properties. In the Rules tab, replace any existing rules with the rules below:

[Settings]
Priority=MacAddress, Default
Properties=MyCustomProperty

[Default]
_SMSTSORGNAME=Me, Myself and IT
_SMSTSPackageName=%TaskSequenceName%
SkipTaskSequence=NO
SkipAdminPassword=YES
SkipProductKey=YES
SkipDomainMembership=YES
SkipUserData=YES
SkipComputerBackup=YES
SkipBitLocker=YES
SkipRoles=YES
SkipComputerName=YES
SkipPackageDisplay=YES
SkipLocaleSelection=YES
SkipTimeZone=YES
SkipApplications=YES
SkipSummary=YES
SkipFinalSummary=YES
UserDataLocation=NONE
ComputerBackupLocation=NETWORK
OSInstall=Y
AdminPassword=Adm1nPassw0rd
TimeZoneName=GMT Standard Time
UILanguage=en-GB
UserLocale=en-GB
KeyboardLocale=en-GB
JoinWorkgroup=WORKGROUP
WSUSServer=http://mni-wsus01:8530
ApplyGPOPack=NO
FinishAction=LOGOFF

[00:15:5D:00:0B:04]
_SMSTSPackageName=Naz’s Image Factory – Windows 10 1607 Reference Image
TaskSequenceID=BUILDW10-1703
BackupShare=\\MNI-MDT01\MDTBuildLab$
BackupDir=Captures
BackupFile=%TaskSequenceID%_#day(date) & “-” & month(date) & “-” & year(date)#.wim
SkipTaskSequence=YES
DoCapture=YES
SkipCapture=YES
SkypSummary=YES

I’d like to draw your attention to a couple of points in the rules above:

The MAC address

Notice that we’ve got a few rules defined underneath a MAC address section, as reproduced below:

[00:15:5D:00:0B:04]
_SMSTSPackageName=Naz’s Image Factory – Windows 10 1607 Reference Image
TaskSequenceID=BUILDW10-1703
BackupShare=\\MNI-MDTSERVER\MDTBuildLab$
BackupDir=Captures
BackupFile=%TaskSequenceID%_#day(date) & “-” & month(date) & “-” & year(date)#.wim
SkipTaskSequence=YES
DoCapture=YES
SkipCapture=YES
SkypSummary=YES

The idea is that when we fire up a virtual machine with this specific MAC address and boot using the boot image, the MDT Deployment Wizard will match the VM’s MAC address with the MAC address in the CustomSettings.ini and process the rules provided. So in this case it will proceed to run the task sequence ID that matches “BUILDW10-1703”, capture the image and save it with a name such as BUILDW10-4-5-17.wim.

If you gave your task sequence a different ID then change it in the rules. Similarly you can change the Mac address in the rules if you wanted to (if you do, make a note of it since you’ll need it in the next post).

Installing Updates

You may remember that we enabled the Windows Update steps in our build and capture task sequence in Part 3 of this series. The following rule tells MDT where to download the updates from:

WSUSServer=http://mni-wsus01:8530

When running the task sequence MDT will inject this WSUS server address into the registry so when the Windows Update steps are run it will do a scan against the server to patch your reference image. Personally I have a dedicated WSUS server for patching my reference images. You can get a WSUS server up and running in no time using instructions available at over at virtuallyboring.com

Note: Ignore the Group Policy section in the instructions as you won’t be needing that to patch your reference image – the rule in the CustomSettings.ini will do that job for you. Once WSUS is installed and configured you’ll need to approve some updates to the “Unassigned computers” group.

The Bootstap.ini Rules

There’s actually one additional set of rules we need to provide before proceeding to our next post. The first step before the MDT Deployment Wizard runs is to authenticate yourself but, again, we can skip this step by providing the credentials in the Bootstrap.ini rules.

On your deployment share properties, click on “Edit Bootstrap.ini” button on the Rules tab. Replace any existing rules with the following:

[Settings]
Priority=Default

[Default]
DeployRoot=\\MNI-MDTSERVER\MDTBuildLab$
UserID=MDTUser
UserDomain=EMENEYE
UserPassword=MDTPassword
KeyboardLocale=en-GB
SkipBDDWelcome=YES

The DeployRoot refers to the full path to your MDT deployment share you created in step 1 in the previous post. Change the credentials to suit your own environment. This should be a user account that has full security and share permissions to your deployment share and also the share your captured image is to be saved in.

Next Post

In the next post we’ll use PowerShell to create a VM with the MAC address in the CustomSettings.ini rules above and boot it using the boot image ISO, which will then proceed to build and capture our reference image as per our rules automatically.

Automate the Process of Building and Capturing a Windows 10 1703 Reference Image: Building the Task Sequence

We’ll continue this series by creating a Build and Capture Task Sequence in this post and then adding the steps in our task sequence to add our applications, packages and scripts to customize the reference image.

(In the previous post we populated our MDT deployment share with our applications, packages, scripts and the Windows 10 1703 image we’re going to need for this post.)

Open up the Deployment Workbench and let’s go ahead and build our task sequence.

Create the Build and Capture Task Sequence

Right-click on the Task Sequence node and select “New Task Sequence”. Go through the Wizard and enter/choose the following options:

  • Task Sequence Id: buildw10-1703
  • Task sequence name: Build and Capture Windows 10 Reference Image (1703)
  • Template: Standard Client Task Sequence
  • Select OS: choose the Windows 10 1703 OS you imported in the previous post
  • Specify Product Key: Do not specify a product key at this time
  • Full Name: Naz (change to your liking)
  • Organization: Me, Myself and IT (change to your liking)
  • Internet Explorer home page: emeneye.wordpress.com (change to your liking)
  • Enter an Administrator password

What we have now is a pretty bare-bones task sequence which will only install Windows and nothing else. We need to edit it to add steps which will turn this Windows installation into a reference image.

Customize the Task Sequence

1) Right-click on the task sequence you created and choose “Properties”. On the “OS Info” tab click on “Edit Unattend.xml” which will Windows System Image Manager.

Expand Components > 7 oobeSystem > amd64_Microsoft-Windows-Shell-Setup__neutral > select OOBE. Enter “3” (without quotes) next to “ProtectYourPC” in the Properties pane (on the right).

Close the Windows System Image Manager window.

2) Back on the properties of the task sequence click on the “Task Sequence” tab. Here you will edit the task sequence to add the applications and packages to install and the scripts to customize our reference image.

Expand the Pre-install group and select the “Apply Patches” step. From the selection profile choose the profile you created which includes the language packs and cumulative update for Windows 10 1703 (this was covered in Step 4 in the previous post).

3) Expand the “State Restore” group and note that all your applications, packages and customisation steps should be added AFTER the “Tattoo” step.

I’ve got a before and after screenshot to show what you should currently have and what it should look like after adding our steps to the Task Sequence to customise our reference image. Use this screenshot and the notes that follow to add your steps.

Here’s the before and after screenshots (sorry it’s a bit :

Before adding customisations After adding customisations
image Picture2

Notes on Editing the Task Sequence

It may be easier to keep the above screenshots in sight while going through the following notes so you have both side by side for reference. Continue reading

Automate the Process of Building and Capturing a Windows 10 1703 Reference Image: Populating the MDT Deployment Share

I wanted to start off this series with populating our MDT Deployment Share with the various bits and pieces we need before building our Task Sequence. Having said that, I assume you already have Microsoft Deployment Toolkit (MDT) installed and know your way around the Deployment Workbench.

I’ve had to break norm and chose not to provide step-by-step instructions with screenshots here due to the length of this post. Also I won’t be going into how to organise the Deployment Workbench to house your scripts, applications and packages, etc. Needless to say, you should organise it in such way to make life easier for yourself and those around you for the long run.

Fire up the Deployment Workbench and let’s get started.

1) Create a Deployment Share

The very first thing you have to do is set up your deployment share. This is essentially a shared folder which will house all your scripts, packages, images, etc.

Right-click on the Deployment Share node in the Deployment Workbench and select “New Deployment Share”. In the wizard, choose or create a folder on your local disk to use as your deployment share. Give your deployment share a name (best not to remove the $ at the end) and finish the wizard with the default values.

Now, browse to the deployment share folder on your local disk and give yourself full security and share permissions, along with any domain user/groups if required.

2) Import Windows 10 1703 into MDT

First things first, use something like 7-zip to extract the contents of the ISO into a folder of your choice. Right-click on Operating Systems in the MDT Deployment Workbench and then import this into MDT, choose full set of source files, point to the extracted ISO folder and give your Windows image a name.

3) Add cumulative updates to install

The latest cumulative update for Windows 10 1703 is KB4016251 at the time of writing. Download the cumulative update from the Microsoft Update Catalog.

Update: Download Cumulative Update KB401620 (April 25 2017) instead as it fixes an issue with loss in network connectivity in virtual machines while provisioning IP addresses (this was causing an intermittent issue with Step 6 in this post).

Save it to a folder.

Create a folder called “CUs for Windows 10 1703” under the Packages node to house your CUs. Right-click on that folder, select Import OS Packages and browse to the folder you saved the CU.

Click Next twice and wait for the import to be finished.

4) Add Language Packs

Obtain the language packs from whichever source is convenient for you – WSUS, SCCM SUP, Microsoft, etc. Bear in mind that each Windows 10 build has its own language pack so make sure you have the correct language pack for your Windows 10 version (1703 in this case).

I’m going to install the UK English language packs in my image.

Copy the language packs into its own folder.

Create a folder under the Packages node and call it something like “EN-GB Language Packs for Windows 10 1703”.

Right-click on that folder, select Import OS Packages and browse to the folder you saved the CU.

Complete the wizard and wait for the import to be finished.

5) Create a Selection Profiles

Expand the Advanced Configuration node and right-click on Selection Profiles and select New Selection profile

Give it a name, click Next

Expand the Packages node, and check the two folders you created in step 2 and 3 which contains your language pack and cumulative update.

6) Add Script to Disable Internet Connectivity

As I explained in the post introducing this series, we need to disable Internet connectivity on our reference machine to prevent Windows Store apps from being updated, which ends up breaking Sysprep. In my lab all I have to do is set a static IP and DNS address using PowerShell without setting default gateway. The PowerShell is only two lines: Continue reading

Automate the Process of Building and Capturing a Windows 10 1703 Reference Image using MDT – Introduction

The release of Windows 10 1703, dubbed the Creators Update, is nearly upon us and I’ve been hard at work testing my OSD scripts and processes using the last couple of Insider Preview builds of the OS (since build 15048). I’ve also taken great strides in automating my build and capture process, which makes sense considering Microsoft is releasing new Windows 10 builds twice a year. This is the first introductory post in a 5-part series on automating the process of building and capturing Windows 10 reference images. 

The image I will build in this series will be what I think of as a “hybrid” reference image with a few things baked into the image to begin with. I’m going to use a Build and Capture task sequence to:

  • Install Windows 10 1703
  • Install the latest Windows 10 cumulative update
  • Disable Internet connectivity (to prevent Windows Store apps from being updated, which ends up breaking Sysprep)
  • Install Office 2016
  • Install .Net Framework 3.5 and 4.6.2
  • Install Visual C++ runtimes
  • Install English UK Language Packs
  • Install Windows, Office and security updates
  • Customize the Windows reference image like below:
    • Set Explorer to launch to This PC
    • Put the Computer icon on the Desktop
    • Create a local account and add it to the Administrators group
    • Create a “mni-utils” folder on the C: drive
    • Remove Windows features (Windows Media Player, XPS Viewer, XPS Services)
  • Run clean up to reduce the image size
  • Re-enable Internet access
  • And finally, Sysprep and capture the reference image, ready to be deployed using SCCM

Automating the above tasks as part of building our reference image requires a few things in place to tie everything together, which includes customsettings.ini, unattend.xml, registry edits and PowerShell.

Here are the posts I have planned for this series:

  • Automate the Process of Building and Capturing a Windows 10 1703 Reference Image: Populating the MDT Deployment Share
  • Automate the Process of Building and Capturing a Windows 10 1703 Reference Image: The Task Sequence (Customizing the Reference Image Before Capturing)
  • Automate the Process of Building and Capturing a Windows 10 1703 Reference Image: The CustomSettings.ini Rules (Skipping the MDT Deployment Wizard)
  • Automate the Process of Building and Capturing a Windows 10 1703 Reference Image: Automation Using PowerShell

I assume you already have Microsoft Deployment Toolkit up and running. If not then check out my post on Installing and Configuring MDT 2010 From Start To Finish. I know it’s a few years old but still works – just be sure to download and install MDT 8443 and give yourself security and share permissions on the Deployment Share. 

I’ll hold off publishing the next post until the Creators Update is officially released by Microsoft so I can do some final tests using the RTM build/ISO.

Quick Fix: Get-MDTComputer by Description Broken in the MDT PowerShell Module

The short story:

Launch SQL Server Management Studio, expand the MDT database > Views > right-click on dbo.ComputerSettings and click on “Design”, tick the “Description” column in the CI table in the View.

The long story:

During my experiments with using PowerShell to automate Windows imaging and deployment tasks I’ve been working with the MDT database module, provided by Michael Niehaus from Microsoft.

I was disappointed to find the Get-MDTComputer cmdlet is broken somewhat, as in you can’t retrieve a computer record from the database matching a description. This is what the error message says when you try:

image

I thought I’d take a look at the Get-MDTComputer function in the PowerShell module and saw that the function was doing nothing more than building a SQL statement and querying the MDT database. Specifically, it was querying the “ComputerSettings” table as shown below:

image

This, along with the error message we saw earlier mentioning “Invalid column name ‘Description'”, led me to fire up the SQL Server Management Studio to examine the “ComputerSettings” table, only to find there isn’t a table with that name but there was a “View” called “ComputerSettings”.

I right-clicked the “ComputerSettings” View and selected “Design” and immediately saw what the issue was here. It was apparent that the problem was that the “ComputerSettings” View didn’t include the “Description” column from the ComputerIdentity table.

So the solution is to tick the checkbox next to the “Description” column in the CI table in the View:

image


And here you can see the Get-MDTComputer cmdlet working with the –Description parameter:

image

Capturing the Reference Windows 10 Image using MDT 2013 Update 2

This is the second of a three-part series on Windows 10 OSD using MDT and SCCM.

Recap: In the first post we populated our MDT deployment share and then created and ran a task sequence to install Windows 10 on a virtual machine along with our applications and the .NET Framework 3.5 enabled. We left the post at the point of having a Windows 10 installation which we can brand as our own and customize the default user profile.

Here, we’re going to pick up from where we left off – I’m going to assume you’ve done all the customization to your liking and thus effectively turning the Windows 10 virtual machine into a reference machine. We’ll create a task sequence to sysprep and capture an image of our virtual machine which will give us our “Reference Windows 10 Image”. We’ll also create the unattend.xml file in this post which we’ll need in the next post. Ok, let’s get started.

Step 1) Create Task Sequence to Capture the Windows 10 Reference Image Continue reading

Building a Reference Windows 10 Image Using MDT 2013 Update 2

This is the first of a three-part series on Windows 10 OSD using MDT and SCCM.

I’m using the Windows 10 Enterprise 64-bit 1511 ISO and MDT 2013 Update 2 for this post. I’m going to assume you already have your MDT build environment up and running and have access to the Windows 10 installation ISO as well as any applications you wish to add to your reference image.

Here’s a quick overview of how this will work:

  • We’ll start off with a blank/vanilla Windows 10 ISO which we’ll import into MDT
  • We’ll also add our applications to MDT
  • We’ll then create a task sequence instructing it to first install this blank/vanilla Windows 10 and then install our applications and also enable .NET Framework 3.5 feature
  • We then run this task sequence on a virtual machine which will leave us with a Windows 10 installation (with our applications installed and .NET Framework 3.5 enabled)
  • We customize Windows, customize the default user profile and effectively turn it into a Reference Virtual Machine

(The next post will cover creating a task sequence to capture this reference machine image and creating an unattend.xml answer file. Running this task sequence on the Reference Virtual Machine will capture an image of our customized Windows 10 and leave us with a “Reference Windows 10 Image”. The final post in the series will cover using SCCM to deploy our “Reference Image” onto a computer)

Step 1) Populating the MDT Deployment Share

Before we can build our reference image we need to populate our deployment share in MDT by importing the Windows 10 media and adding applications.  Continue reading