Windows 10 Upgrade: End User Experience

I worked really hard in designing the Windows-as-a-Service at my workplace. It’s been a great learning experience full of engineering and automation experience. A lot of superstars in the tech community have posted their upgrade task sequences and scripts and I wanted to write a post of my own specifically to demonstrate the user experience in the upgrade process.

What I have here is basically the guidance we’ve provided to our own staff which is perfect for the purpose of this post.

Introduction

Following our previous update, we’ve had a very successful run of the upgrade during our pilot phase and are now ready to roll this out to the rest of the organisation. 

The Windows 10 1909 Upgrade should be available to your device shortly; this will appear in the Software Centre. You will get a prompt advising you when the installation is ready. This is what it looks like:

When the upgrade is available for your device you will initially be notified by this prompt:
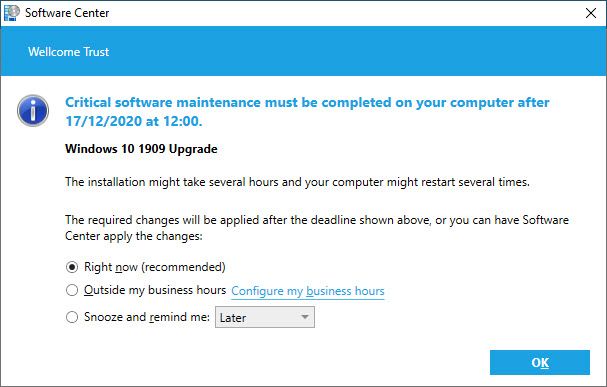
Install prompt

Install Reminders

You can either upgrade straight away if it is convenient for you or you can snooze the upgrade.

You will also be prompted every 2-3 hours reminding you that the upgrade is available for you to install. This will include instructions for you to follow and the deadline for the upgrade.

An example of this prompt is provided below:

image

Once you see this you can either go directly to Software Center from this window or follow the instructions below.

Deadline date: Please note that you will be given a deadline date to run this upgrade; if you fail to upgrade by this time, your system will perform a forced upgrade, which may cause interruption. Therefore, to prevent this we recommend you run this upgrade at your earliest convenience.  

Before you upgrade: make sure your laptop charger is plugged in and Global Protect is connected.

Instructions on how to install the upgrade:

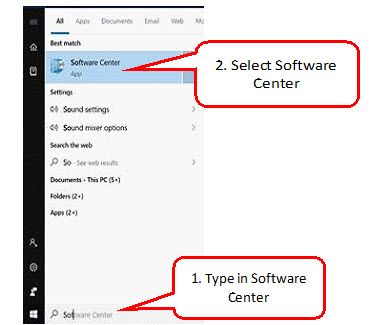
1. Open Software Center from the Start menu (or type it into search bar once you click start).

Software center from Start Menu

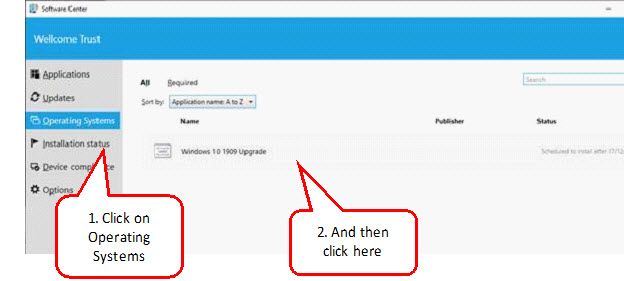
2. Click on the “Operating Systems” tab. You will see “Windows 10 1909 Upgrade” listed here.

selecting upgrade option

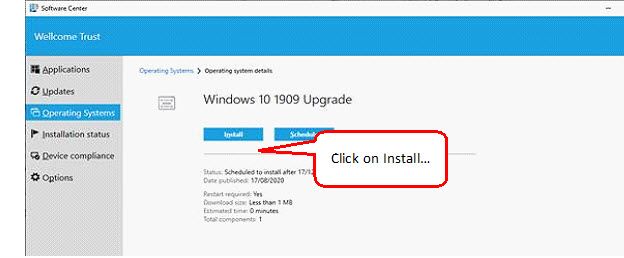
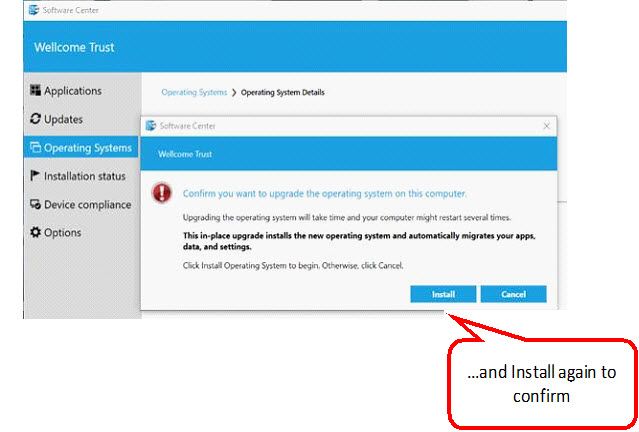
3. Click on the ‘Install’’ button and confirm installation by clicking Install again.

Click to install

Confirm installation

Confirm installation

4. Software Center will then close automatically – do not be concerned by this, rest assured the upgrade will continue in the background.

Please do not unplug the charger and remain connected via Global Protect.

Note: It is recommended to start the upgrade at the end of the day or during lunch break and walk away to allow the upgrade to continue without any interruptions.

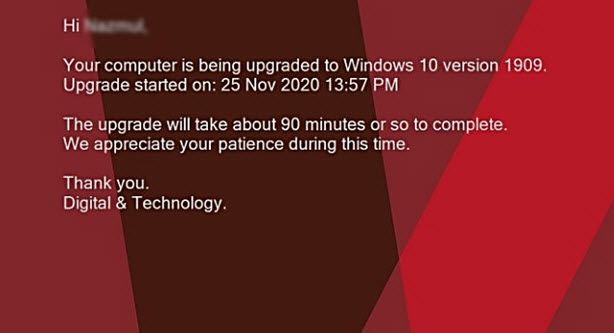
You will see a message on the lock screen advising you that an upgrade is in progress. Although not recommended. you can log back in again if you wish but please do not restart or shut down the computer until you are prompted to do so as mentioned below.

This is what the upgrade process will entail:

  • Installation will take place in the background and will take just over 90 minutes.
  • If working from home it is recommended to install the upgrade at the end of the day and walk away so the upgrade can continue without interruptions.
  • Once install has completed you will be prompted to restart your computer with a 15-minute countdown.
  • When prompted please close all open applications and click on the ‘Restart Now’ button.
  • If you do not click on “Restart Now” within the 15 minute window the computer will forcefully restart. Please DO NOT restart the computer using the power button or from the Start menu but instead click on ‘Restart Now’ in the prompt that will be displayed.
  • Your computer will restart and finish installing the upgrade. This part will take roughly 30 minutes during which you will not be able to log on. It is normal for the computer to restart a couple of times during this stage.
  • Once the lock screen displays a message that the upgrade was successful you can go ahead and log on. The first log on after the upgrade will take a couple of minutes longer than usual.

If you sign out or lock your computer:

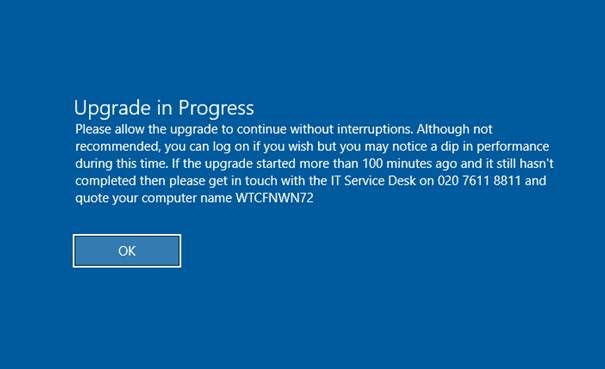
You will see a message on the lock screen advising you that an upgrade is in progress which will look like this:

sign or lock your computer

You can log back in again and continue working. You’ll see this message when logging on while the upgrade is in progress:

Upgrade in progress

You can continue working until you see a prompt to restart as mentioned earlier.

When the upgrade is complete:

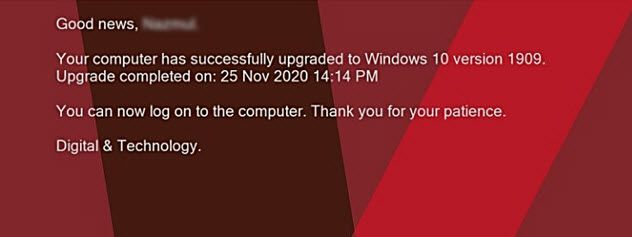
The message on the lock screen will change to say the upgrade finished successfully as shown below:

Upgrade complete

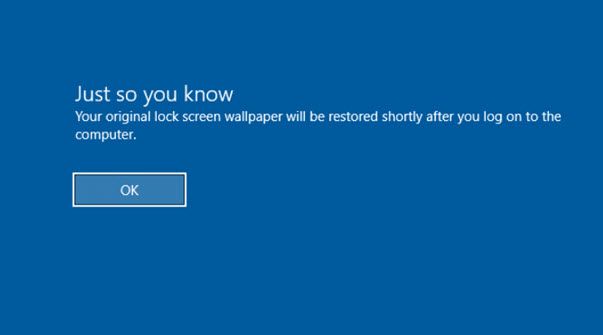
And when logging on you will see a message to say that your original lock screen wallpaper will be restored:

original lock screen wallpaper will be restored

Further support & information:

  • If the computer failed to upgrade, the lock screen wallpaper will display a message. You will still be able to login in and continue to work, despite the upgrade failure.
  • If this happens, please raise a ticket with Service Desk with ‘Windows10 upgrade fail’ in the subject line along with your device service tag in the description.
  • A member of the D&T team will be in touch, advising you of the failure and how to re-start the installation.

Windows AutoPilot Feasibility

I recently carried out a feasibility study on Windows AutoPilot with a view to replicate as much as we can from my current Windows 10 task sequence for our staff devices. This is a quick post with my findings and recommendations.

Requirements for AutoPilot:

Windows 10 1703 or higher

All of our Windows 10 computers are 1809 or higher.

Microsoft Intune license

Covered by our EM+S E5 license

Azure Active Directory Premium

Covered by our EM+S E5 license

Device registration in Intune

Devices will need to be registered by Dell (OEM) or CDW (Reseller). Dell will register devices for free but will charge £30 fee per device to remove bloatware.
We will need to find out from CDW if they provide a service to register devices to Intune/AutoPilot and what the associated costs are.

Azure Active Directory custom branding

Custom branding has already been done in our tenant

Azure Active Directory automatic enrolment

This will need to be configured. This allows users to enroll devices to Intune (the enrolment takes place as part of the device set up process). However, enabling this raises the question “can we enable this and stop users from enrolling their personal devices into Intune as well?

Configure Autopilot profiles

This is a collection of rules and configurations to set up the computer during the device set up process.

Source: https://docs.microsoft.com/en-us/windows/deployment/windows-autopilot/windows-autopilot-requirements

Replicating the Task Sequence in AutoPilot and Intune

AutoPilot will only make sense for the standard Staff build since it is designed to be handed over to the user who goes through a few simple steps and then Intune kicks in.

Step

Notes

Clean Windows image

Possible options include:

BIOS Configurations (password, secure boot, TPM, etc)

BIOS configuration will need to be set either from the OEM or will need to be done after the computer is handed over to the user.

All computers come with UEFI, Secure Boot and TPM activated. The only exception is password and UEFI Network Stack. UEFI Network Stack is only required for PXE-boot which we don’t need for AutoPilot. However, password will need to be set using ‘Dell Command Configure’ post-deployment.

https://ccmexec.com/2019/09/configuring-dell-bios-settings-using-intune-win32app-and-powershell/

BIOS Updates

Although the BIOS updates can be packaged as an application and deployed via Intune it would be easier to manage this using SCCM (to be updated after deployed)

Set computer name

Naming ‘patterns’ can be set in the AutoPilot configuration profile. The %SERIAL% macro but unsure how flexible this is (for example truncating Surface Pro serial numbers and adding WT).

https://blog.basevision.ch/2019/06/ultimate-guide-to-define-device-names-in-windows-autopilot-hybrid-join-scenario/

Join on-premise domain

By default AutoPilot computers join Azure Active Directory. To join on-premise AD as well then additional configuration need to be done to enable Hybrid Azure AD Join.

https://docs.microsoft.com/en-us/intune/windows-autopilot-hybrid

Also requires TPM 2.0:

https://docs.microsoft.com/en-us/azure/active-directory/devices/hybrid-azuread-join-plan

Move to correct OU

You can select an OU to move all computers to as part of the AutoPilot configuration profile.

Currently in our environment we move laptops and desktops to separate OUs, which we cannot do using AutoPilot.

Our options are:

  • Setup AutoPilot for laptops only (and continue using SCCM for desktops)
  • Move both laptops and computers to the same OU but maintain separate AD groups to identify computers by hardware

Add to AD security groups

Computers can be added to Azure Groups but not to on-premise AD groups. Since this functionality is not provided natively by AutoPilot a solution will need to be engineered.

Driver updates

Similar to BIOS updates this will need to be managed using SCCM post deployment.

SCCM Client

Options are:

  • Deploy as a win32 app from Intune
  • Rely on SCCM client push installation (AD object gets discovered and client is deployed to the machine

Local admin account

https://docs.microsoft.com/en-us/azure/active-directory/devices/assign-local-admin

https://www.risual.com/2019/02/05/managing-local-admins-with-intune-azure-ad-join-devices/

Install staff build applications

Win32 applications can now be deployed through Intune

https://docs.microsoft.com/en-us/intune/apps-win32-app-management

https://www.robinhobo.com/how-to-deploy-win32-applications-with-microsoft-intune/

Install Office 365

Can be packaged as a package and deployed through Intune or Office 365 apps can be “assigned” to devices/users using Intune

  • If we deploy this as a package then it will continue to be patched through SCCM
  • If assigned to devices/users then it will be patched directly from Microsoft thus will need more work to understand how this works

https://docs.microsoft.com/en-us/intune/apps-add-office365

OneDrive auto sign in

This is possible using Azure AD Join.

Redirect user folders to OneDrive

Options are:

  • OneDrive Known Folder Move
  • Group Policy redirect

(will rely on Hybrid Azure AD Join)

Install Symantec

Although this is possible to be deployed using a package moving to AutoPilot might be an opportunity to trial Windows Defender?

This will require more discussions and input form the of Information Security.

Applications chosen by service desk

This feature will NOT be available through AutoPilot.

Alternative options are:

  • We enable applications to be deployed to users so Service Desk deploys the applications to users in advance and when the computer is in SCCM the application will be deployed to the user. However, we will need to make sure the application can only be installed on one device when deployed to the user.

Apply Start Menu Layout

A custom Start menu layout can be applied using Intune

https://docs.microsoft.com/en-us/windows/configuration/customize-windows-10-start-screens-by-using-mobile-device-management

Enable BitLocker

BitLocker can be enabled using Intune

https://www.sepago.de/blog/bitlocker-how-to-configure-bitlocker-drive-encryption-on-windows-10-clients-in-microsoft-intune/

Further research is required to make sure BitLocker uses TPM and the recovery key can be stored in the computer object in on-premise AD.

Run PowerShell scripts (Corporate font, registry tweaks, etc.

PowerShell scripts can be run from Intune

https://matthewjwhite.co.uk/2019/06/13/deploy-custom-fonts-to-intune-managed-devices/

https://docs.microsoft.com/en-us/intune/intune-management-extension

https://albertneef.wordpress.com/2018/06/01/part-16-configure-microsoft-intune-powershell-scripts/

Launch TrustNet at log on

TrustNet shortcut can be deployed using a PowerShell script in a package and deployed to the device using Intune.

Recommendations

With the ‘work from home’ scenario amid the current pandemic there is a real need to provision end user devices for new staff and making the onboarding process as simple as possible without access to the office. It is therefore absolutely necessary to take this work a step forward and carry out a proof of concept of Windows Autopilot which has the potential of simplifying the end user device provisioning and onboarding process.

References:

https://docs.microsoft.com/en-us/windows/deployment/windows-autopilot/user-driven
https://www.scconfigmgr.com/2019/04/01/replicating-task-sequences-in-autopilot-part-1-bare-metal/

January 2018 Cumulative Update for Windows 10 1703 is Not Installing in Task Sequence

I recently upgraded to SCCM 1710 and also updated MDT to v8450 and ADK to v1709. After the upgrade, I discovered Software Updates were broken in my Task Sequences. Specifically the Windows updates weren’t being installed (except for a Adobe Flash security update) whereas the Office 2016 updates were installing fine. At first I thought the update to 1710 had broken it but after a little digging I found that the January Cumulative update looks for the existence of the following registry item before installing the update:

HKLM\SOFTWARE\Microsoft\Windows\CurrentVersion\QualityCompat"

Value Name="cadca5fe-87d3-4b96-b7fb-a231484277cc"

Type="REG_DWORD”

Data="0x00000000”

So if the registry item is not present then the January cumulative update will not install as documented by Microsoft.

Important: The requirement of the registry item is related to the recent Spectre and Meltdown vulnerabilities. Many Anti-Virus software use the kernel in an unsupported way which would cause Windows 10 to BSOD if the cumulative update was to be installed. Hence Microsoft requires AV vendors to fix their software and then create the above registry item as a signal that the update can be safely installed.

Update and Test Anti-Virus Software Installation

Most likely you will need to get in touch with your AV vendor and find out if they have updated their software to fix the issue with the kernel and that it creates the registry item. You will need to obtain the updated version of AV software and run a test install.

This is what I done in my testing:

  • Obtained the updated AV software
  • Did a test AV install and checked the registry item is created
  • I then tried and successfully installed the January cumulative update manually

Once I was confident the above works well I then reproduced this in my task sequence.

Testing in a Task Sequence

The first thing I tried was to set the registry item manually using a Run Command Line step without installing the AV software. This way I was able to verify that my Install Software Updates step was working since the January cumulative update installed fine.

REG ADD HKLM\SOFTWARE\Microsoft\Windows\CurrentVersion\QualityCompat /v cadca5fe-87d3-4b96-b7fb-a231484277cc /t REG_DWORD /d 0 /f

Do not create this registry item manually in your Task Sequence unless you’re absolutely sure the antivirus software will create it anyway.

Next I moved on to see if the AV software would create the registry item. I made sure the Task Sequence installed the Anti-Virus software first and the Install Software Step would run afterwards. During my test run I added a condition to my Install Software Updates step to check for the existence of the registry item, just to be on the safe side.

image

Dual Scan: The Undesirable Windows 10 Update Behaviour

The Windows 10 estate in our environment consists primarily of v1511 and v1607. All new computers (and any being re-imaged) get Windows 10 1607 installed, which is our ‘Production’ build. We have Windows 10 updates deployed to the All Unknown Computers collection which ensures that updates are installed during OSD. This is Windows 10 “Security Updates” and “Critical Updates” only and does NOT include feature updates.

The End User Computing team are yet to green light Windows 10 1703 hence the 1703 feature update has not been approved in the Windows 10 Servicing plans. However, we noticed recently that 2L Engineers click on “Check for updates” AFTER build has completed and not only are there additional updates to install but the Windows 10 1703 feature update get installed too. Now, this is interesting because, like I said, the feature update hasn’t been approved in the Windows 10 servicing plans. (Note, I’m specifically referring to the ‘Check for updates’ button and not the “Check online for updates from Microsoft Update” link.)

Now, I’ve done a lot of testing and reproduced the issue in my lab and confirmed the culprit was Dual Scan. Enabling certain Windows Update for Business (WUfB) group policy settings (or Registry or MDM settings) triggers the Dual Scan behaviour which scans both internal WSUS or SCCM SUP servers as well as Microsoft Update servers for patches and feature updates. Annoyingly, it ignores the local WSUS or SUP servers and gives precedence to Windows Update. This is exactly what was happening in our environment. Consider the following screenshot of WindowsUpdate.log from a newly installed Windows 10 1607 device after having clicked on the Check for updates button and installed the feature update. It confirms Windows 10 is reaching out to Microsoft Update servers:

Picture1

So what actually triggered the Dual Scan behaviour? Generally speaking, using certain group policy settings related to WUfB enables Dual Scan. Microsoft mentions some of these settings in “Using ConfigMgr With Windows 10 WUfB Deferral Policies”. In our environment we had the Specify intranet Microsoft update service location setting set to our internal SUP server. In “Manage settings for software updates” Microsoft recommends that this setting should not be enabled using Group Policy because the machine policy received from SCCM will populate this setting in the local policy on the client computer and point to the SUP servers. Having the policy set using Group Policy in addition to the local policy being enabled by SCCM causes undesirable side effects, one of which is Dual Scan.

How do we stop this happening? For Windows 10 607 you will need to install the August cumulative update (or better yet KB4039396). For Windows 10 1703 you will need the October cumulative update installed. Then you will need to install the latest Windows 10 1709 administrative templates which includes a setting called “Do not allow update deferral policies to cause scans against Windows update” which will disable the Dual Scan behaviour. It’s important to note that simply updating the administrative templates will not be enough. You need the above cumulative updates/KB’s installed to be able to take advantage of the new group policy setting to disable Dual Scan.

After having taken the above actions in my lab I carried out further testing and found no additional updates, feature updates or otherwise, were available to install after OSD completed, thereby disabling Dual Scan successfully.

Automate the Process of Building and Capturing a Windows 10 1703 Reference Image: Building the Task Sequence

We’ll continue this series by creating a Build and Capture Task Sequence in this post and then adding the steps in our task sequence to add our applications, packages and scripts to customize the reference image.

(In the previous post we populated our MDT deployment share with our applications, packages, scripts and the Windows 10 1703 image we’re going to need for this post.)

Open up the Deployment Workbench and let’s go ahead and build our task sequence.

Create the Build and Capture Task Sequence

Right-click on the Task Sequence node and select “New Task Sequence”. Go through the Wizard and enter/choose the following options:

  • Task Sequence Id: buildw10-1703
  • Task sequence name: Build and Capture Windows 10 Reference Image (1703)
  • Template: Standard Client Task Sequence
  • Select OS: choose the Windows 10 1703 OS you imported in the previous post
  • Specify Product Key: Do not specify a product key at this time
  • Full Name: Naz (change to your liking)
  • Organization: Me, Myself and IT (change to your liking)
  • Internet Explorer home page: emeneye.wordpress.com (change to your liking)
  • Enter an Administrator password

What we have now is a pretty bare-bones task sequence which will only install Windows and nothing else. We need to edit it to add steps which will turn this Windows installation into a reference image.

Customize the Task Sequence

1) Right-click on the task sequence you created and choose “Properties”. On the “OS Info” tab click on “Edit Unattend.xml” which will Windows System Image Manager.

Expand Components > 7 oobeSystem > amd64_Microsoft-Windows-Shell-Setup__neutral > select OOBE. Enter “3” (without quotes) next to “ProtectYourPC” in the Properties pane (on the right).

Close the Windows System Image Manager window.

2) Back on the properties of the task sequence click on the “Task Sequence” tab. Here you will edit the task sequence to add the applications and packages to install and the scripts to customize our reference image.

Expand the Pre-install group and select the “Apply Patches” step. From the selection profile choose the profile you created which includes the language packs and cumulative update for Windows 10 1703 (this was covered in Step 4 in the previous post).

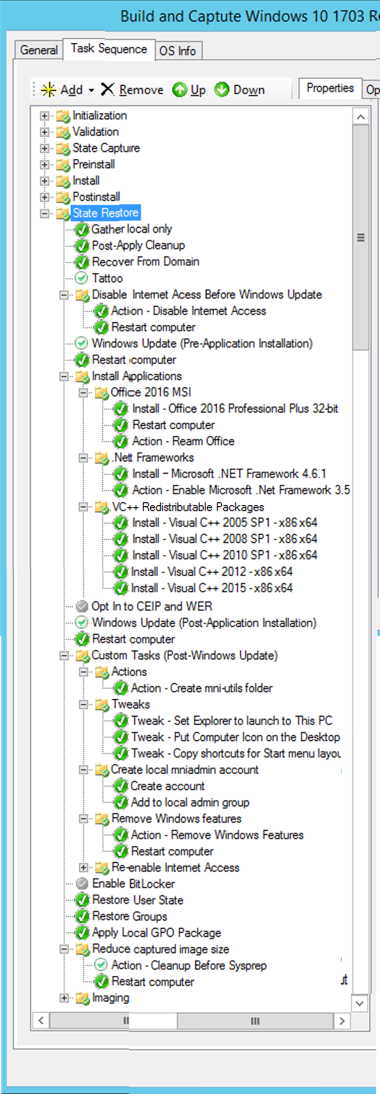
3) Expand the “State Restore” group and note that all your applications, packages and customisation steps should be added AFTER the “Tattoo” step.

I’ve got a before and after screenshot to show what you should currently have and what it should look like after adding our steps to the Task Sequence to customise our reference image. Use this screenshot and the notes that follow to add your steps.

Here’s the before and after screenshots (sorry it’s a bit :

Before adding customisations After adding customisations
image Picture2

Notes on Editing the Task Sequence

It may be easier to keep the above screenshots in sight while going through the following notes so you have both side by side for reference. Continue reading

Automate the Process of Building and Capturing a Windows 10 1703 Reference Image: Populating the MDT Deployment Share

I wanted to start off this series with populating our MDT Deployment Share with the various bits and pieces we need before building our Task Sequence. Having said that, I assume you already have Microsoft Deployment Toolkit (MDT) installed and know your way around the Deployment Workbench.

I’ve had to break norm and chose not to provide step-by-step instructions with screenshots here due to the length of this post. Also I won’t be going into how to organise the Deployment Workbench to house your scripts, applications and packages, etc. Needless to say, you should organise it in such way to make life easier for yourself and those around you for the long run.

Fire up the Deployment Workbench and let’s get started.

1) Create a Deployment Share

The very first thing you have to do is set up your deployment share. This is essentially a shared folder which will house all your scripts, packages, images, etc.

Right-click on the Deployment Share node in the Deployment Workbench and select “New Deployment Share”. In the wizard, choose or create a folder on your local disk to use as your deployment share. Give your deployment share a name (best not to remove the $ at the end) and finish the wizard with the default values.

Now, browse to the deployment share folder on your local disk and give yourself full security and share permissions, along with any domain user/groups if required.

2) Import Windows 10 1703 into MDT

First things first, use something like 7-zip to extract the contents of the ISO into a folder of your choice. Right-click on Operating Systems in the MDT Deployment Workbench and then import this into MDT, choose full set of source files, point to the extracted ISO folder and give your Windows image a name.

3) Add cumulative updates to install

The latest cumulative update for Windows 10 1703 is KB4016251 at the time of writing. Download the cumulative update from the Microsoft Update Catalog.

Update: Download Cumulative Update KB401620 (April 25 2017) instead as it fixes an issue with loss in network connectivity in virtual machines while provisioning IP addresses (this was causing an intermittent issue with Step 6 in this post).

Save it to a folder.

Create a folder called “CUs for Windows 10 1703” under the Packages node to house your CUs. Right-click on that folder, select Import OS Packages and browse to the folder you saved the CU.

Click Next twice and wait for the import to be finished.

4) Add Language Packs

Obtain the language packs from whichever source is convenient for you – WSUS, SCCM SUP, Microsoft, etc. Bear in mind that each Windows 10 build has its own language pack so make sure you have the correct language pack for your Windows 10 version (1703 in this case).

I’m going to install the UK English language packs in my image.

Copy the language packs into its own folder.

Create a folder under the Packages node and call it something like “EN-GB Language Packs for Windows 10 1703”.

Right-click on that folder, select Import OS Packages and browse to the folder you saved the CU.

Complete the wizard and wait for the import to be finished.

5) Create a Selection Profiles

Expand the Advanced Configuration node and right-click on Selection Profiles and select New Selection profile

Give it a name, click Next

Expand the Packages node, and check the two folders you created in step 2 and 3 which contains your language pack and cumulative update.

6) Add Script to Disable Internet Connectivity

As I explained in the post introducing this series, we need to disable Internet connectivity on our reference machine to prevent Windows Store apps from being updated, which ends up breaking Sysprep. In my lab all I have to do is set a static IP and DNS address using PowerShell without setting default gateway. The PowerShell is only two lines: Continue reading

Automate the Process of Building and Capturing a Windows 10 1703 Reference Image using MDT – Introduction

The release of Windows 10 1703, dubbed the Creators Update, is nearly upon us and I’ve been hard at work testing my OSD scripts and processes using the last couple of Insider Preview builds of the OS (since build 15048). I’ve also taken great strides in automating my build and capture process, which makes sense considering Microsoft is releasing new Windows 10 builds twice a year. This is the first introductory post in a 5-part series on automating the process of building and capturing Windows 10 reference images. 

The image I will build in this series will be what I think of as a “hybrid” reference image with a few things baked into the image to begin with. I’m going to use a Build and Capture task sequence to:

  • Install Windows 10 1703
  • Install the latest Windows 10 cumulative update
  • Disable Internet connectivity (to prevent Windows Store apps from being updated, which ends up breaking Sysprep)
  • Install Office 2016
  • Install .Net Framework 3.5 and 4.6.2
  • Install Visual C++ runtimes
  • Install English UK Language Packs
  • Install Windows, Office and security updates
  • Customize the Windows reference image like below:
    • Set Explorer to launch to This PC
    • Put the Computer icon on the Desktop
    • Create a local account and add it to the Administrators group
    • Create a “mni-utils” folder on the C: drive
    • Remove Windows features (Windows Media Player, XPS Viewer, XPS Services)
  • Run clean up to reduce the image size
  • Re-enable Internet access
  • And finally, Sysprep and capture the reference image, ready to be deployed using SCCM

Automating the above tasks as part of building our reference image requires a few things in place to tie everything together, which includes customsettings.ini, unattend.xml, registry edits and PowerShell.

Here are the posts I have planned for this series:

  • Automate the Process of Building and Capturing a Windows 10 1703 Reference Image: Populating the MDT Deployment Share
  • Automate the Process of Building and Capturing a Windows 10 1703 Reference Image: The Task Sequence (Customizing the Reference Image Before Capturing)
  • Automate the Process of Building and Capturing a Windows 10 1703 Reference Image: The CustomSettings.ini Rules (Skipping the MDT Deployment Wizard)
  • Automate the Process of Building and Capturing a Windows 10 1703 Reference Image: Automation Using PowerShell

I assume you already have Microsoft Deployment Toolkit up and running. If not then check out my post on Installing and Configuring MDT 2010 From Start To Finish. I know it’s a few years old but still works – just be sure to download and install MDT 8443 and give yourself security and share permissions on the Deployment Share. 

I’ll hold off publishing the next post until the Creators Update is officially released by Microsoft so I can do some final tests using the RTM build/ISO.

Windows 10 “Creators Update”

As a true fan of Windows 10 and an avid Windows Insider watching the Windows 10 Event was super exciting for me – as an enthusiast I hugely enjoy watching new technology and hardware being unveiled live. Microsoft announced some great things in the event but my focus was all on the Windows 10 Creators Update and I definitely liked what I saw was coming. You can watch the event on demand right here.

Watch the video below titled “Introducing the Windows 10 Creators Update” and keep a close watch for some of the features coming in the update, due in early 2017:

Here’s a look at some of my favourite among the many features coming in the Windows 10 Creators Update.

Paint 3D

We’ve been wondering all these years what Paint is STILL doing in Windows but now Microsoft decided to rewrite the app from the ground app. I first heard of this form Paul Thurrott on his website, but the video above shows what an awesome job Microsoft has done with Paint 3D.

Microsoft has made this as simple as taking a photograph, take a look at this GIF from the event below:

castlegif

You can see an actual sand castle is being scanned using a smart phone which is then instantly converted into a full 3D model.  Continue reading

Windows 10, Delivery Optimisation and BranchCache

Delivery Optimisation is a Windows 10 feature which, when enabled, essentially creates a peer-to-peer ‘network’ of sorts where each peer can cache downloaded Windows 10 updates locally on their hard drive. The idea is to conserve bandwidth by allowing Windows 10 devices to send and receive updates from one another on the same network without having to download it from WSUS or Windows Update. This, of course, is especially useful in slow network or metered environments.

The introduction of this feature doesn’t affect you if you’re using SCCM Software Update Point (SUP) for patch management and Windows 10 servicing. Delivery Optimisation only kicks in when the Windows Update agent contacts Windows Update (via Internet) or WSUS. By contrast, with SUP the updates are downloaded to the SUP server and then delivered to the PC which is where the Windows Update agent installs them from.

Delivery Optimisation is enabled by default on 1511 and 1607 though it’s configured differently depending on the Windows 10 edition. Enterprise, Enterprise LTSB and Education editions are configured to only use PCs on the corporate network as peers (LAN mode). Pro and Home editions default to using peers from the Internet (Internet mode).

There’s a Group Policy setting called “Download Mode” (in Computer Configuration > Administrative Templates > Windows Components > Delivery Optimization) which you use to configure Delivery Optimisation “modes” (referred to in the above paragraph). Here is a table showing you what download modes are available to you and the functionality it provides when set:  Continue reading

SCCM: Preparing for the Windows 10 Anniversary Update

You’ll find there’s a little bit of pre-preparation work that needs to be done to get SCCM Current Branch ready for the Windows 10 Anniversary Update. I spent the weekend doing this myself on my SCCM 1602 lab and thought somebody might find it helpful to have it documented here.

To be clear, this isn’t a how-to post but more of an informational one. What follows is a set of tasks that need to be carried out on SCCM 1602 along with links to downloads and further information for each task.

1) First things first, upgrade SCCM CB to 1606. (Upgrading from 1511 to 1606 pretty much works exactly the same as upgrading from 1602 as described by Prajwal Desai in his blog).

2) After upgrading you need to install hotfix KB3184153 from the Updates and Servicing node to fix an issue with compliance policy rules in version 1606. If you switched to the fast ring to upgrade to 1606 you’ll also have KB3180992 to install.

3) Install KB3159706 on your SCCM 1606 SUP Servers to “enable the provisioning of decryption keys in WSUS for Windows Server 2012 and 2012 R2. This update is necessary for WSUS to be able to natively decrypt the encrypted Windows 10 Anniversary Update packages, and any subsequent Windows 10 feature upgrades”. Don’t forget to carry out the manual steps described on the support page.

Continue reading