Intune: Reproducing Windows Update Experience

With the integration of SCCM and Intune into Microsoft Endpoint Manager, Microsoft is trying to get us to adopt modern management practices for our Windows endpoints. The advent of hybrid working amid the global pandemic has validated this push for this modern management powered by the Cloud.

Microsoft have done an awesome job in helping with our Cloud journey from providing fantastic documentation to the likes of Settings Catalog in Intune. However, I feel they’ve dropped the ball in other aspects and could be doing better to help us with this transition.

Consider moving the Windows updates workload from on-premises SCCM to Intune. Consider the following screenshots which shows our deployment deadline and reboot behaviour configurations in SCCM.

image

image

Now if I were to move this workload to Intune, I am presented with this configuration experience:

image

Why couldn’t Microsoft provide with identical options in Intune so we can just get a quick win, safe in the knowledge that the end user experience is going to be the same? Wouldn’t that make it easier for us to switch to Intune?

The ‘admin experience’ of moving from SCCM to Intune in this case requires one to decipher what all these options mean from the documentation and trying to come up with something that follows the existing policies.

Also, consider the end user experience. Why do we have to follow the existing policies and behaviour? We have previously run a campaign of emails and articles on how the update rings and reboot behaviours work to educate our users so they’re not caught out by a reboot unexpectedly, for example. Ideally, I’d like the user experience to remain exactly the same as it was with SCCM.

So in the above example, what options have I chosen that will allow the user experience to remain something similar?

I’ve set the Automatic update behaviour to Notify download. Microsoft says “If the user takes no action, the update will not install until the deadline you have configured is reached”. The key bit here is “until the deadline”.

image

So I’ve enabled deadline settings and set the deadline for quality updates to 2 days and the Grace period to 1 day. This means the user has 2 days to install the updates after being notified and has 1 day to restart their device before it is forced.

image

As for the reminders, we have no options for recurring reminders every x hours. Instead what we have is the “Remind user prior to required auto-restart with dismissible reminder (hours)” option which is a one-time reminder that the user can dismiss. I’ve set this to 4 hours prior to restart.

And I’ve set the user to be notified 60 minutes before the restart which they cannot dismiss.

image

How I Went from MDT Integrated Task Sequence to Native SCCM

I started a new job six months ago as a EUC/SCCM Engineer where, after having delivered a couple of high profile objectives, one of the goals I have set myself is to combine 3 task sequences into one and to simplify the resulting Task Sequence.

I initially considered dumping the MDT integrated Task Sequence and going native SCCM, favouring the clean and simplified layout of the native TS in comparison to the MDT integrated one. But after a little deliberation I dismissed the idea since I was hoping to spin up a MDT database to make the Task Sequence and the build process truly dynamic, plus I really liked having all those extra task sequence variables that comes with MDT.

But then Gary Blok (from garytown.com) tweeted that he had moved away from MDT integrated to native SCCM and I was swayed again by his clean all-native task sequence. He even provided instructions on how to create a “MDT Lite” package which gave you access to all the additional task sequence variables without all the bloat.

So, taking inspiration from Gary I decided to go native SCCM.

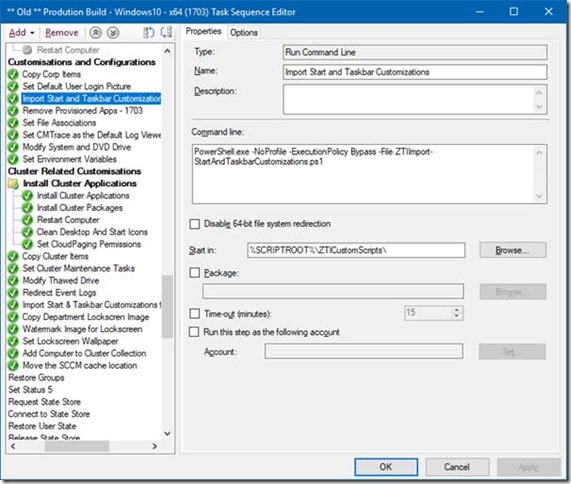
In my MDT integrated task sequence I have all my PowerShell scripts in a folder called “ZTICustomScripts” which sits in the Scripts folder in the MDT Toolkit Files package. That way I can call the script by referencing the “%SCRIPTROOT%” variable, like below:

clip_image002

I knew that if I wanted to move to native SCCM task sequence then I will need to be able to still reference the “%SCRIPTROOT%” variable, which would mean I can copy and paste these steps from one TS to another.

I followed Gary’s blog post to create my MDT Lite package, except for copying the BGInfo files since I use the excellent OSD Background tool instead. Of course, I also added my ZTICustomScripts folder which contains all my PowerShell scripts:

image

I created a package called MDT Lite with the above contents. This is how I used it in my new all-native Task Sequence:

Created a group called “Download MDT Lite” right after the partitioning steps.

Added a “Download Package Content” task and called it “Download MDT Lite Package”. I selected the MDT Lite package I created and set the download location to “Task Sequence working directory”. I checked “Save path as a variable” and chose “MDTLite” as the variable name.

image

Note that to be able to reference the contents of this package we have to append “01” to the name of the variable, thus “MDTLite01”. (If we had a second package to download in the list then that package location would be referenced as “MDTLite02”.)

I can now reference the Scripts folder within this package as “%MDTLite01%\Scripts”, but that would mean updating each and every one of my Run Command Line steps with the new path which is something I did not want to do. So I set my own custom task sequence variable called “SCRIPTROOT” and set its value to “%MDTLite01%\Scripts”, shown below:

image

This meant that I can just copy and paste my Run Command Line steps (which run my PowerShell scripts) to the new native task sequence with very little to no changes. I can also create a nested Task Sequence with all the steps to run my scripts which I can use in the MDT integrated TS and the native TS which has not gone into production just yet (and thus avoid duplication of efforts).

Lastly I done the same for the %ToolRoot% variable as well.

The resulting task sequence is a lot leaner and much easier to take in.

Choose a Disk to Install Windows on using WPF and PowerShell

I recently tweeted a screenshot of a GUI I created using WPF and PowerShell to let engineers choose the disk to install Windows on, intended to be used in a SCCM Task Sequence. I was then asked by (none other than!) David Segura to share this with the rest of the community.

In my last post I wrote about how I found a workaround to a snag I hit upon while using the MahApps.Metro theme. That was almost 10 months ago. That post was meant to be a precursor to introducing this GUI but I got busy with life and my new job so the blog took a back seat. I’m glad that David’s reply has spurred me on to write this post and introduce the GUI. (I also have a few more posts lined up inspired by Gary Blok’s endeavour to break away from MDT and go native ConfigMgr. More on that soon.)

Update 1: I included steps in the Task Sequence to make the GUI appear only if more than one disk is present, as suggested by Marcel Moerings in the comments.

Update 2: I updated the script to exclude USB drives.

Background

SCCM will install the OS on disk 0 by default. In my previous environment two disk configurations were very common so I created this GUI for Engineers to choose the disk to install Windows on. This works by leveraging the “OSDDiskIndex” task sequence variable. If you set this variable to your desired disk number then SCCM will install the OS on that disk.

This is what the GUI looks like when run in full OS:

clip_image003

And this is what it looks like when run in a Task Sequence:

clip_image005

Prerequisites

You will need to add the following components to your Boot Image:

  • Windows PowerShell (WinPE-PowerShell)
  • Windows PowerShell (WinPE-StorageWMI)
  • Microsoft .Net (WinPE Dot3Svc)

How to Implement

Simples :)

  • Download the solution and extract the zip file
  • Create a standard package with the contents of the zip file. Do not create a program.
  • In your task sequence add a Group called “Choose Disk” before the partitioning steps
  • Within the group add a Run Command Line task and name it “Check if there’s more than one Hard Disk”. Enter the following one-liner:
PowerShell.exe -NoProfile -Command "If ((Get-Disk | Where-Object -FilterScript {$_.Bustype -ne 'USB'}).Count -gt 1) {$TSEnv = New-Object -COMObject Microsoft.SMS.TSEnvironment;$TSEnv.Value('MoreThanOneHD') = $true}"

one liner

  • Add another Run Command Line step and name it “Choose Disk to Install OS”, and choose the package you created. Add the following command line:
%SYSTEMROOT%\System32\WindowsPowerShell\v1.0\powershell.exe -STA -NoProfile -ExecutionPolicy Bypass -File .\ChooseDiskWPF.ps1

choose disk

  • In the Options tab for the “”Choose Disk to Install OS” step, Click on Add Condition > Task Sequence Variable > type “MoreThanOneHD” in the variable field, set the condition to “equals” and the value to “TRUE”

condition

Bear in mind that this does not exclude removable drives. This is because I always run a set of pre-flight checks as a first step which weed out any removable drives before this GUI is presented hence looking out for removable drives was not duplicated in this solution.

The Code

Clear-Host 


# Assign current script directory to a global variable

$Global:MyScriptDir = [System.IO.Path]::GetDirectoryName($myInvocation.MyCommand.Definition)


# Load presentationframework and Dlls for the MahApps.Metro theme

[System.Reflection.Assembly]::LoadWithPartialName(“presentationframework”| Out-Null

[System.Reflection.Assembly]::LoadFrom($Global:MyScriptDir\assembly\System.Windows.Interactivity.dll”| Out-Null

[System.Reflection.Assembly]::LoadFrom($Global:MyScriptDir\assembly\MahApps.Metro.dll”| Out-Null


Temporarily close the TS progress UI

$TSProgressUI = New-Object COMObject Microsoft.SMS.TSProgressUI

$TSProgressUI.CloseProgressDialog()


# Set console size and title

$host.ui.RawUI.WindowTitle = “Choose hard disk…”


Function LoadForm {

    [CmdletBinding()]

    Param(

     [Parameter(Mandatory=$True,Position=1)]

     [string]$XamlPath

    )


    # Import the XAML code

    [xml]$Global:xmlWPF = Get-Content -Path $XamlPath


    Add WPF and Windows Forms assemblies

    Try {

        Add-Type AssemblyName PresentationCore,PresentationFramework,WindowsBase,system.windows.forms

    }

    Catch {

        Throw “Failed to load Windows Presentation Framework assemblies.”

    }


    #Create the XAML reader using a new XML node reader

    $Global:xamGUI = [Windows.Markup.XamlReader]::Load((new-object System.Xml.XmlNodeReader $xmlWPF))


    #Create hooks to each named object in the XAML

    $xmlWPF.SelectNodes(“//*[@Name]”| ForEach {

        Set-Variable -Name ($_.Name) -Value $xamGUI.FindName($_.Name) -Scope Global

    }

}


Function Get-SelectedDiskInfo {

    # Get the selected disk with the model which matches the model selected in the List Box

    $SelectedDisk = Get-Disk | Where-Object $_.Number eq $Global:ArrayOfDiskNumbers[$ListBox.SelectedIndex] }


    # Unhide the disk information labels

    $DiskInfoLabel.Visibility = “Visible”

    $DiskNumberLabel.Visibility = “Visible”

    $SizeLabel.Visibility = “Visible”

    $HealthStatusLabel.Visibility = “Visible”

    $PartitionStyleLabel.Visibility = “Visible”


    # Populate the labels with the disk information

    $DiskNumber.Content = $($SelectedDisk.Number)

    $HealthStatus.Content = $($SelectedDisk.HealthStatus)$($SelectedDisk.OperationalStatus)

    $PartitionStyle.Content = $SelectedDisk.PartitionStyle


    # Work out if the size should be in GB or TB

    If ([math]::Round(($SelectedDisk.Size/1TB),2lt 1) {

        $Size.Content = $([math]::Round(($SelectedDisk.Size/1GB),0)) GB”

    }

    Else {

        $Size.Content = $([math]::Round(($SelectedDisk.Size/1TB),2)) TB”

    }

}


# Load the XAML form and create the PowerShell Variables

LoadForm XamlPath $MyScriptDir\ChooseDiskXAML.xaml


# Create empty array of hard disk numbers

$Global:ArrayOfDiskNumbers = @()


# Populate the listbox with hard disk models and the array with disk numbers

Get-Disk | Where-Object -FilterScript {$_.Bustype -ne ‘USB’} | Sort-Object {$_.Number}| ForEach {

    # Add item to the List Box

    $ListBox.Items.Add($_.Model) | Out-Null


    # Add the serial number to the array

    $ArrayOfDiskNumbers += $_.Number

}


# EVENT Handlers

$OKButton.add_Click({

    If no disk is selected in the ListBox then do nothing

    If (-not ($ListBox.SelectedItem)) {

        # Do nothing

    }

    Else {

        Else If a disk is selected then get the disk with matching disk number according to the ListBox selection

        $Disk = Get-Disk | Where-Object {$_.Number eq $Global:ArrayOfDiskNumbers[$ListBox.SelectedIndex]}


        Set the Task Sequence environment object

        $TSEnv = New-Object COMObject Microsoft.SMS.TSEnvironment


        # Populate the OSDDiskIndex variable with the disk number

        $TSEnv.Value(OSDDiskIndex= $Disk.Number


        # Close the WPF GUI

        $xamGUI.Close()

    }

})


$ListBox.add_SelectionChanged({ 

    # Call function to pull the disk informaiton and populate the details on the form

    Get-SelectedDiskInfo

})


# Launch the window

$xamGUI.ShowDialog(| Out-Null

January 2018 Cumulative Update for Windows 10 1703 is Not Installing in Task Sequence

I recently upgraded to SCCM 1710 and also updated MDT to v8450 and ADK to v1709. After the upgrade, I discovered Software Updates were broken in my Task Sequences. Specifically the Windows updates weren’t being installed (except for a Adobe Flash security update) whereas the Office 2016 updates were installing fine. At first I thought the update to 1710 had broken it but after a little digging I found that the January Cumulative update looks for the existence of the following registry item before installing the update:

HKLM\SOFTWARE\Microsoft\Windows\CurrentVersion\QualityCompat"

Value Name="cadca5fe-87d3-4b96-b7fb-a231484277cc"

Type="REG_DWORD”

Data="0x00000000”

So if the registry item is not present then the January cumulative update will not install as documented by Microsoft.

Important: The requirement of the registry item is related to the recent Spectre and Meltdown vulnerabilities. Many Anti-Virus software use the kernel in an unsupported way which would cause Windows 10 to BSOD if the cumulative update was to be installed. Hence Microsoft requires AV vendors to fix their software and then create the above registry item as a signal that the update can be safely installed.

Update and Test Anti-Virus Software Installation

Most likely you will need to get in touch with your AV vendor and find out if they have updated their software to fix the issue with the kernel and that it creates the registry item. You will need to obtain the updated version of AV software and run a test install.

This is what I done in my testing:

  • Obtained the updated AV software
  • Did a test AV install and checked the registry item is created
  • I then tried and successfully installed the January cumulative update manually

Once I was confident the above works well I then reproduced this in my task sequence.

Testing in a Task Sequence

The first thing I tried was to set the registry item manually using a Run Command Line step without installing the AV software. This way I was able to verify that my Install Software Updates step was working since the January cumulative update installed fine.

REG ADD HKLM\SOFTWARE\Microsoft\Windows\CurrentVersion\QualityCompat /v cadca5fe-87d3-4b96-b7fb-a231484277cc /t REG_DWORD /d 0 /f

Do not create this registry item manually in your Task Sequence unless you’re absolutely sure the antivirus software will create it anyway.

Next I moved on to see if the AV software would create the registry item. I made sure the Task Sequence installed the Anti-Virus software first and the Install Software Step would run afterwards. During my test run I added a condition to my Install Software Updates step to check for the existence of the registry item, just to be on the safe side.

image

Dual Scan: The Undesirable Windows 10 Update Behaviour

The Windows 10 estate in our environment consists primarily of v1511 and v1607. All new computers (and any being re-imaged) get Windows 10 1607 installed, which is our ‘Production’ build. We have Windows 10 updates deployed to the All Unknown Computers collection which ensures that updates are installed during OSD. This is Windows 10 “Security Updates” and “Critical Updates” only and does NOT include feature updates.

The End User Computing team are yet to green light Windows 10 1703 hence the 1703 feature update has not been approved in the Windows 10 Servicing plans. However, we noticed recently that 2L Engineers click on “Check for updates” AFTER build has completed and not only are there additional updates to install but the Windows 10 1703 feature update get installed too. Now, this is interesting because, like I said, the feature update hasn’t been approved in the Windows 10 servicing plans. (Note, I’m specifically referring to the ‘Check for updates’ button and not the “Check online for updates from Microsoft Update” link.)

Now, I’ve done a lot of testing and reproduced the issue in my lab and confirmed the culprit was Dual Scan. Enabling certain Windows Update for Business (WUfB) group policy settings (or Registry or MDM settings) triggers the Dual Scan behaviour which scans both internal WSUS or SCCM SUP servers as well as Microsoft Update servers for patches and feature updates. Annoyingly, it ignores the local WSUS or SUP servers and gives precedence to Windows Update. This is exactly what was happening in our environment. Consider the following screenshot of WindowsUpdate.log from a newly installed Windows 10 1607 device after having clicked on the Check for updates button and installed the feature update. It confirms Windows 10 is reaching out to Microsoft Update servers:

Picture1

So what actually triggered the Dual Scan behaviour? Generally speaking, using certain group policy settings related to WUfB enables Dual Scan. Microsoft mentions some of these settings in “Using ConfigMgr With Windows 10 WUfB Deferral Policies”. In our environment we had the Specify intranet Microsoft update service location setting set to our internal SUP server. In “Manage settings for software updates” Microsoft recommends that this setting should not be enabled using Group Policy because the machine policy received from SCCM will populate this setting in the local policy on the client computer and point to the SUP servers. Having the policy set using Group Policy in addition to the local policy being enabled by SCCM causes undesirable side effects, one of which is Dual Scan.

How do we stop this happening? For Windows 10 607 you will need to install the August cumulative update (or better yet KB4039396). For Windows 10 1703 you will need the October cumulative update installed. Then you will need to install the latest Windows 10 1709 administrative templates which includes a setting called “Do not allow update deferral policies to cause scans against Windows update” which will disable the Dual Scan behaviour. It’s important to note that simply updating the administrative templates will not be enough. You need the above cumulative updates/KB’s installed to be able to take advantage of the new group policy setting to disable Dual Scan.

After having taken the above actions in my lab I carried out further testing and found no additional updates, feature updates or otherwise, were available to install after OSD completed, thereby disabling Dual Scan successfully.

Adding Network (and Storage) Drivers to Boot Images in SCCM

Having written a post on Obtaining and Importing Drivers in SCCM for HP Client Devices it seems only fitting to follow it up with a post on adding drivers to boot images in SCCM. So here goes.

For this post I will add the driver for the StarTech USB-C to Gigabit Network Adapter (product id US1GC30B) to my boot image.

clip_image001

Although I have the drivers on a driver CD that came with the adapter I wanted to go ahead and look for a more up-to-date driver. I first had a look on the StarTech website for the drivers which told me a) the original chipset manufacturer (Realtek) and b) the chipset model (RTL8153). Armed with this information I then had a look on the Realtek website an immediately found a more up to date driver (10.13 vs 10.10). As I explained in my previous post, you almost always find the latest drivers from the original chipset manufacturer.

If you already have the driver imported in SCCM

Before going ahead with the step-by-step instructions, if you’ve already got the driver imported into SCCM then all you need to do is to go into the Properties of the boot image and add the drivers in the Drivers tab:

clip_image002

Continue reading

Configure your Task Sequence to Install Driver Packages for Client Devices

This is a continuation of  my post Obtaining and Importing Drivers in SCCM for HP Client Devices where we obtained drivers for our reference HP EliteBook 820 G3 laptop, imported them into the SCCM database, created a driver package and distributed the package to our Distribution Points.

Before carrying on with the instructions here please make sure you have the exact model name of your laptop as reported by WMI. We covered this under “Get the Correct Model Name of the Client Device” in the previous post. (Run “WMIC csproduct GET name” in a command prompt on your client device and make a note of the model name *exactly* as shown.)

As I explained in the previous post the idea is to configure our task task sequence to only install this driver package for this particular model. That’s where the model name comes into the picture. Any typos in the model name will cause the task sequence to skip this driver package from being installed during OSD.

Instructions for MDT Task Sequence

Locate the “Auto Apply Drivers” step under Post Install and disable it.

Add a group under Post Install called Install Drivers

Add a group under Install Drivers called HP

Under HP add an “Apply Driver Package” step, give it a name and choose the driver package you just created

Check “Do unattended installation of unsigned drivers on versions of Windows where this is allowed”

You should have something like this:

clip_image013

Select the HP group and add the following rules in the Options tab:

clip_image015

Select the HP EliteBook 820 G3 step and add the following rules in the Options tab:

clip_image017

This is where you’ll need the model name of the laptop which we obtained using a WMIC query earlier in the post (under Get the Correct Model Name of the Client Device).

Instructions for SCCM Task Sequence

For your SCCM task sequence locate the “Apply Device Drivers” step and disable it.

Add a group under Post Install called Install Drivers

Add a group under Install Drivers called HP

Under HP add an “Apply Driver Package” step, give it a name and choose the driver package you just created

Check “Do unattended installation of unsigned drivers on versions of Windows where this is allowed”

You should have something like this:

clip_image019

Select the HP group and add the following rules in the Options tab:

Add an If statement and choose Any

Add the following WMI Queries

SELECT * FROM Win32_ComputerSystem WHERE Manufacturer LIKE “HP”
SELECT * FROM Win32_ComputerSystem WHERE Manufacturer LIKE “Hewlett Packard%”

Select the HP EliteBook 820 G3 step and add the following rules in the Options tab:

SELECT * FROM Win32_ComputerSystem WHERE Model LIKE “HP EliteBook 820 G3”

Test your Task Sequence

At this point you’ve got everything set up. Go head and test your task sequence. Hopefully you won’t have any  exclamation marks in Device Manager.


Obtaining and Importing Drivers in SCCM for HP Client Devices

I quickly found while using the HP Client Integration Kit that, though the tool makes it easy to download and import drivers, the size of the resulting drivers and packages is excessively big. Using the HP EliteBook 820 G3 as an example device, when using the HP CIK the resulting size of the drivers is 2.3GB for this laptop compared to 823MB using the method I’ll describe in this post.

In this post we will:

  • Obtain the drivers for our device
  • Import the drivers into SCCM and create a driver package
  • Configure a task sequence to install the driver package
  • Set rules in the task sequence to only install this driver package on HP EliteBook 820 G3 laptops

I will assume you already have a Task Sequence created to build your Windows computer.

Obtaining the Drivers

I use the 820 G3 as an example here but you can adapt this for any make and model. This is a hands-on method of obtaining drivers which does take a little time but I’ve found this gives me the best result during OSD and less driver bloat.

1) Install HP Support Assistant and install any driver updates on your client device

2) Install Intel Driver Update Utility and install any updated drivers, if available

3) (Optional) Install drivers from third party manufacturers.

This step is more manual so will take some time which is why I’ve marked it as optional. This is preferable if you want to make sure you want to start off with the latest drivers for your devices in your SCCM database.

Open up Device Manager and identify devices from third party manufacturers like Broadcom, AMD, Realtek, etc. Go to each of their website and check if there’s a more recent driver available and install them.

4) Backup your installed drivers using Double Driver.

Double Driver basically scans your current system, identifies your device drivers and backs them up for you which you can then use with SCCM. I’ve been using Double Driver for a few years now but didn’t think of using this with SCCM until very recently.

Download the portable tool and run it on your client device. Click on Backup > Scan Current System and wait for the tool to identify your device drivers.

Here is a screenshot of the drivers identified on the HP EliteBook 820 G3:

clip_image004

Click on “Backup Now” and choose a destination to store your drivers. Make sure you leave the “Structured folder (default)” selected. Click on OK

clip_image005

Keep the resulting backup drivers handy to be imported into your SCCM database

Get the Correct Model Name of the Client Device

Further along in this post we’ll create a driver package for our drivers which we’ll then use in our task sequence. We’ll need to create a rule in our task sequence to only install this driver package for this particular computer model. For this reason we’ll need to extract the correct model name of this device at this stage using the following WMI query in an elevated command prompt:

WMIC csproduct GET name

clip_image007

Make a note of the result exactly as shown and keep it safe. We’ll need it further along in the post.

Create Source Folders for your Device Drivers and Driver Package

Note that before importing the drivers you need a source folder for your device drivers and a separate folder for your driver package. I always stress the importance of organising the SCCM software repository with a clear and easily identifiable folder structure to better manage your packages (or drivers in this case). Create a folder structure for your client device driver management similar to below:

Source folder for device drivers:

\\sccmserver\Source\OSD\Drivers\Device Drivers\HP\Windows 10 x64\EliteBook 820 G3

Source folder for driver packages:

\\sccmserver\Source\OSD\Drivers\Driver Packages HP\Windows 10 x64\EliteBook 820 G3

2) Copy the drivers you backed up using Double Driver into the source folder for device drivers similar to above.

Import the Drivers in SCCM and Create a Driver Package

1) Open up the SCCM console and select the Software Library workspace. Expand Operating Systems and select Drivers. Click on “Import Driver” in the ribbon

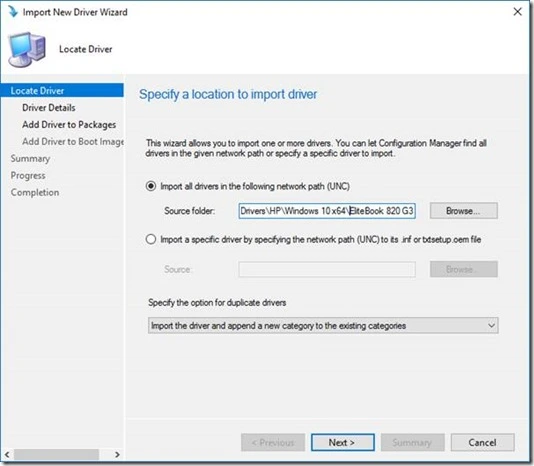
2) In the Import New Driver Wizard leave the first option selected and enter or browse to the UNC path where you copied your device drivers. In my case it’s \\sccmserver\Source\OSD\Drivers\Device Drivers\HP\Windows 10 x64\EliteBook 820 G3

Under “Specify the option for duplicate drivers” choose

clip_image009

3) Driver Details page:

Uncheck “Hide drivers that are not in a storage or network class (for boot images)”

Uncheck “Hide drivers that are not digitally signed”

Check “Enable these drivers and allow computers to install them”

Click on Categories and either select an existing category to add these drivers to or create a new category.

clip_image011

4) In the Add Drivers to Packages step we’ll create a new driver package HP EliteBook 820 G3

For the name of the package I suggest you enter a name which identifies the model of the computer and the OS and architecture the driver package is intended for.

Something like HP EliteBook 820 G3 – Windows 10 x64

Under “Path” enter or browse to the source folder you created for the driver package. In my case it’s \\sccmserver\Source\OSD\Drivers\Driver Packages HP\Windows 10 x64\EliteBook 820 G3

Finish the rest of the wizard without making any changes to the defaults (do not add any drivers to any boot images when asked).

Distribute the Driver Package to your Distribution Points

Go ahead and distribute the driver package to your DPs.

You may also want to create a folder structure in your SCCM console under Driver Packages and move your package to it. Something like Driver Packages\Windows 10 x64

Configure your Task Sequence to Install the Driver Package

I noticed this post is quite long so I’ve split it into two and moved this section into it’s own post titled Configure your Task Sequence to Install the Driver Package. You can continue with the rest of the instructions over there.


SCCM: Preparing for the Windows 10 Anniversary Update

You’ll find there’s a little bit of pre-preparation work that needs to be done to get SCCM Current Branch ready for the Windows 10 Anniversary Update. I spent the weekend doing this myself on my SCCM 1602 lab and thought somebody might find it helpful to have it documented here.

To be clear, this isn’t a how-to post but more of an informational one. What follows is a set of tasks that need to be carried out on SCCM 1602 along with links to downloads and further information for each task.

1) First things first, upgrade SCCM CB to 1606. (Upgrading from 1511 to 1606 pretty much works exactly the same as upgrading from 1602 as described by Prajwal Desai in his blog).

2) After upgrading you need to install hotfix KB3184153 from the Updates and Servicing node to fix an issue with compliance policy rules in version 1606. If you switched to the fast ring to upgrade to 1606 you’ll also have KB3180992 to install.

3) Install KB3159706 on your SCCM 1606 SUP Servers to “enable the provisioning of decryption keys in WSUS for Windows Server 2012 and 2012 R2. This update is necessary for WSUS to be able to natively decrypt the encrypted Windows 10 Anniversary Update packages, and any subsequent Windows 10 feature upgrades”. Don’t forget to carry out the manual steps described on the support page.

Continue reading

SCCM Hotfix Stuck on “Prerequisite Check Passed”

Note: This process will also work if your 1606 update is stuck on “Prerequisite check passed”.

I had to fix a little problem before I could upgrade my SCCM CB to 1606 – the “Configuration Manager 1602 Hotfix (KB3155482)” update pack was stuck on “Prerequisite check passed” while the option to install the hotfix was greyed out. Annoyingly the 1606 update was also greyed out, so I couldn’t proceed without first dealing with the problematic hotfix.

clip_image002

I had a recent backup to fall back on but I opted to tackle the problem head on. Here’s how I done it…

  • I found the folder the update pack was downloaded into and made a note of the folder name (which had a random set of characters, referred to as the package guid)
  • Deleted the record of the package with the above guid from the SCCM database
  • Refreshed the view in the Update and Servicing node and restarted the SMS_EXECUTE service
  • The update pack was then downloaded again in the Update and Servicing node
  • I then proceeded with the installation as normal

Detailed instructions below:

In my case the Hotfix update pack was already downloaded which was located in a folder in the “SCCM Install Location\EasySetupPayload” directory: Continue reading