Azure Virtual Network, VPN and Azure Virtual Desktop Setup

I recently had to completely rebuild my home lab and this time decided to extend it into Azure as well. I wanted to take a moment to document what my lab in Azure currently looks like.

It’s not an extensive setup, with only a virtual network and a site-to-site VPN connection with my home lab and also the Azure Virtual Desktop side of things too. I’ve built, tore down and rebuilt the AVD host pools several times and will continue to do so.

Since all my resources in Azure are currently in one Resource Group the ‘Resource visualizer’ is perfect for this:

image

Of course, this doesn’t show my Intune and AutoPilot policies and profiles which I will document separately.

My lab at home is a super simple setup with a AD DC which has DNS, DHCP, RRAS and CA, a ConfigMgr/SCCM primary site. I also have a separate RRAS server with OpenVPN Cloud connector to simulate WAN/off-site access which is primarily used to test AutoPilot with AAD Join and domain access using WHfB.

Enable Azure Active Directory SSO for OpenVPN Cloud

This is the third post in the OpenVPN Cloud series aimed at lab use. In the previous post we created user accounts in the portal but in this step we are going to enable SSO with Azure so we don’t have to create users manually in the OVPN portal.

1) Log onto the OpenVPN Cloud by browsing to your portal URL. This is set to “YourOpenVPNID.openvpn.com”. Log in with the account you signed up with (owner account).

2) Go to Settings section and click on the User Authentication tab and click Edit on the top right corner.

image

Click on the Configure button under the SAML option

image

This will open a new window with the SAML configuration details. Keep this window open as you’ll need these details to setup SSO in Azure. 

image

Now to create an enterprise application in Azure.

3) Log onto Azure Active Directory and create a Group with members who you want to have access to OpenVPN Cloud.

4) Back on Azure AD click on the “Enterprise applications” blade on the left

image

Click on New Application

image

And then click on Create your own application.

image

5) Give you app a name and choose the option “Integrate any other application you don’t find in the gallery (Non-gallery)”

image

Click Create

6) Under Getting Started click on “Assign users and groups” and go ahead and add the group of users you created earlier

image

7) Click on “Set up single sign on” on the left and then click on SAML.

image

8) Click on Edit next to Basic SAML Configuration

image

9) Refer back to the SAML details provided in the window opened in the OpenVPN Cloud portal and enter the following details.

image

For Identifier enter the Issuer name.

For Reply URL enter the SSO URL provided.

image

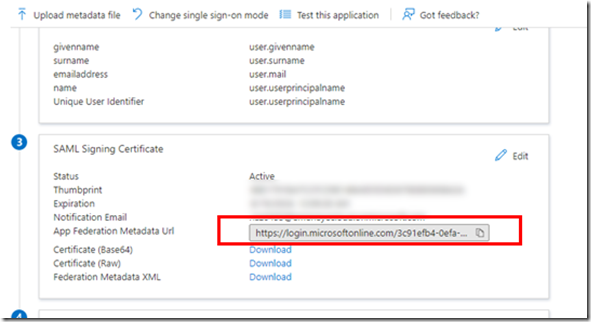
10) Scroll down to SAML Signing Certificate and copy the App Federation Metadata URL. You’ll need this in a bit.

image

11) Now back on the OpenVPN Cloud page with the SAML details, click on Next

image

12) Enter a name for the identity provider and paste in the App Federation Metadata URL from the SAML Signing Certificate section of the enterprise app in Azure.

image

Click Next and Finish.

13) Head back into Settings and then click on User Authentication and click on Edit on the top right

image

Select SAML and click on the Update button and the Confirm.

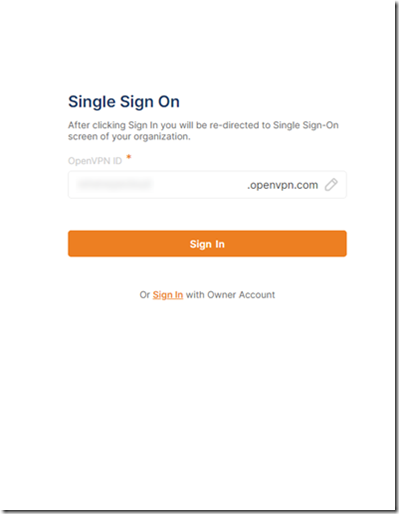
That’s it. The next time you browse to your OpenVPN Cloud portal url you will see a Sign in button which will redirect you to the Azure sign in screen.

image

image

OpenVPN Cloud Endpoint Testing

So in the last post we stopped at the point of creating additional users who you want to give VPN access to. I also explained that the connection from the RRAS server to the OpenVPN Cloud counts as 1 out of 3 connections so you are left with two connections for your endpoints/users.

Now let’s get the connector installed on our endpoint device and our users connected.

Just a quick reminder that the portal address is “youropenvpncloudId.openvpn.com”

1) Log into your OpenVPN web portal and add your end users. Note that the email address here must be valid for this to work. Since this is intended for lab use just enter your own for testing.

image_thumb[10]

2) Build a VM with Windows 10 installed. The virtual network adapter must be connected to the Internal switch to join the domain and verify you can ping the domain and maybe access a file share or something.

3) Now change the virtual network adapter so it’s bound to the External switch instead to simulate offsite access. Verify that you cannot ping the domain.

4) On this VM log into the email address you provided for the user which has instructions on how to install the connector app. It’s just a standard MSI so go ahead and install it.

image

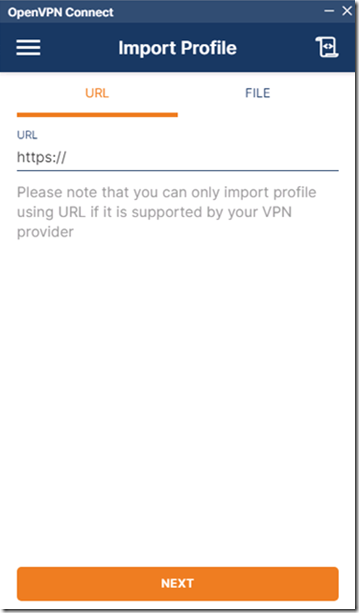
5) Open the connector app and enter your OpenVPN Cloud portal URL.

image

Sign in with the user account ID you created earlier.

Choose your Region and click Connect. It should only take a few seconds to establish the VPN connection.

image

Verify that you can ping your domain and access file shares.

You can, of course, install the endpoint connector on a physical domain-joined laptop and connect to your Wi-Fi (assuming your lab is on a Internal/Private network) to test this.

In the next post I will go through instructions on how to enable Azure SSO so you don’t have to manually create the user accounts in the portal and better simulate a production environment.

Split Tunnel VPN with OpenVPN Cloud

I wanted to set up VPN split tunnelling for my home lab to simulate my workplace (which uses a commercial VPN solution ) to build a proof of concept of Windows AutoPilot with on-premise domain access from Azure AD joined devices.

I came across OpenVPN Cloud which provides you with 3 connections for free/personal use.

A couple of notes on my setup:

My host server has one Internal switch and one External switch. I installed RRAS on a Windows server VM in my lab running Windows Server 2016 with two virtual network adapters, one connected to the Internal switch and the other on the External switch. Both have DHCP enabled. Now for the instructions:

1) Install RRAS on a Windows server box (mine is on Windows Server 2016) with two virtual network adapters as mentioned above.

2) Enable routing on the server and follow the rest of these instructions on this RRAS server

3) Sign up for a free personal account and create your OpenVPN ID.

image

3) Once logged in, click on Networks on the left and and select “Remote Access” and follow the rest of the wizard.

image

Give your network a name.

Give the connector a name and select your region. This is the RRAS server on which you will have a OpenVPN connector (agent) running.

Add your lab subnet under Private Subnets.

4) Next select where to deploy the connector. I chose Windows, downloaded the connector and installed it on my RRAS server mentioned above.

5) Open the OpenVPN Connector on the RRAS server, sign in with the user account/email address you signed up with and you should see a connection established.

image

Back on the OpenVPN web portal click Next and wait for the connection to be shown as established on that end too.

6) Next add your internal DNS to the web portal.

image

7) Click on Users and add a second user. This is the user who will be signing into VPN from an endpoint device over WAN/off-site. You can, of course, create more users here if you wish.

image

This completes the setup of the OpenVPN Cloud on the server side. I will soon write a follow up post on how to get endpoint devices connected via VPN.

Note that the connector which you installed on the RRAS server and the connection that it established with OpenVPN Cloud is counted as 1 of the 3 free connections you get with the free account. So you actually have only two connections for your endpoint devices. However, for quick POCs and lab use this is more than enough.

Windows 10 Upgrade: End User Experience

I worked really hard in designing the Windows-as-a-Service at my workplace. It’s been a great learning experience full of engineering and automation experience. A lot of superstars in the tech community have posted their upgrade task sequences and scripts and I wanted to write a post of my own specifically to demonstrate the user experience in the upgrade process.

What I have here is basically the guidance we’ve provided to our own staff which is perfect for the purpose of this post.

Introduction

Following our previous update, we’ve had a very successful run of the upgrade during our pilot phase and are now ready to roll this out to the rest of the organisation. 

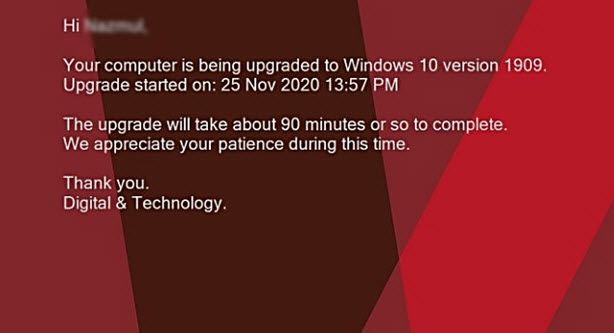
The Windows 10 1909 Upgrade should be available to your device shortly; this will appear in the Software Centre. You will get a prompt advising you when the installation is ready. This is what it looks like:

When the upgrade is available for your device you will initially be notified by this prompt:

Install prompt

Install Reminders

You can either upgrade straight away if it is convenient for you or you can snooze the upgrade.

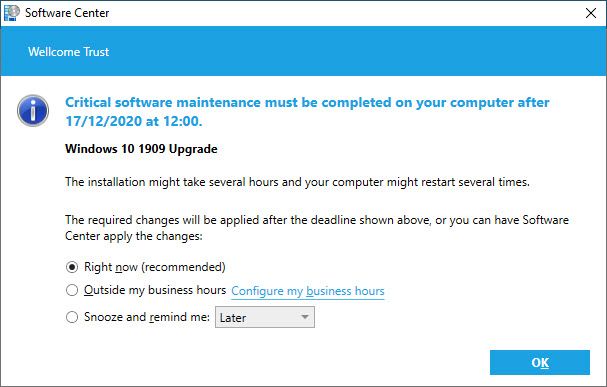
You will also be prompted every 2-3 hours reminding you that the upgrade is available for you to install. This will include instructions for you to follow and the deadline for the upgrade.

An example of this prompt is provided below:

image

Once you see this you can either go directly to Software Center from this window or follow the instructions below.

Deadline date: Please note that you will be given a deadline date to run this upgrade; if you fail to upgrade by this time, your system will perform a forced upgrade, which may cause interruption. Therefore, to prevent this we recommend you run this upgrade at your earliest convenience.  

Before you upgrade: make sure your laptop charger is plugged in and Global Protect is connected.

Instructions on how to install the upgrade:

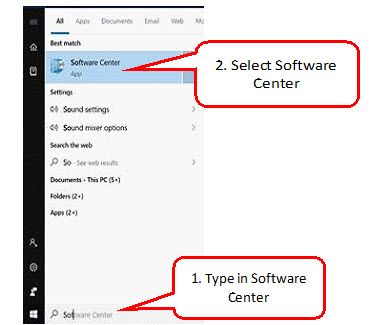
1. Open Software Center from the Start menu (or type it into search bar once you click start).

Software center from Start Menu

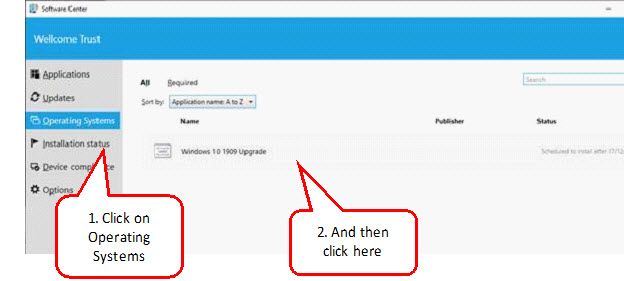
2. Click on the “Operating Systems” tab. You will see “Windows 10 1909 Upgrade” listed here.

selecting upgrade option

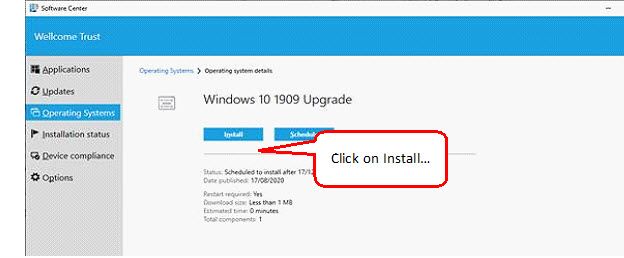
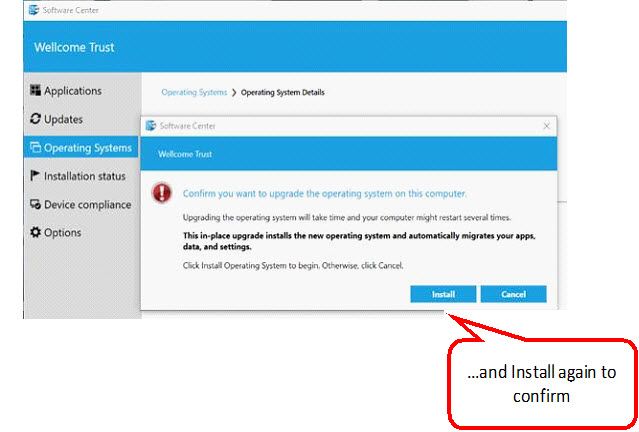
3. Click on the ‘Install’’ button and confirm installation by clicking Install again.

Click to install

Confirm installation

Confirm installation

4. Software Center will then close automatically – do not be concerned by this, rest assured the upgrade will continue in the background.

Please do not unplug the charger and remain connected via Global Protect.

Note: It is recommended to start the upgrade at the end of the day or during lunch break and walk away to allow the upgrade to continue without any interruptions.

You will see a message on the lock screen advising you that an upgrade is in progress. Although not recommended. you can log back in again if you wish but please do not restart or shut down the computer until you are prompted to do so as mentioned below.

This is what the upgrade process will entail:

  • Installation will take place in the background and will take just over 90 minutes.
  • If working from home it is recommended to install the upgrade at the end of the day and walk away so the upgrade can continue without interruptions.
  • Once install has completed you will be prompted to restart your computer with a 15-minute countdown.
  • When prompted please close all open applications and click on the ‘Restart Now’ button.
  • If you do not click on “Restart Now” within the 15 minute window the computer will forcefully restart. Please DO NOT restart the computer using the power button or from the Start menu but instead click on ‘Restart Now’ in the prompt that will be displayed.
  • Your computer will restart and finish installing the upgrade. This part will take roughly 30 minutes during which you will not be able to log on. It is normal for the computer to restart a couple of times during this stage.
  • Once the lock screen displays a message that the upgrade was successful you can go ahead and log on. The first log on after the upgrade will take a couple of minutes longer than usual.

If you sign out or lock your computer:

You will see a message on the lock screen advising you that an upgrade is in progress which will look like this:

sign or lock your computer

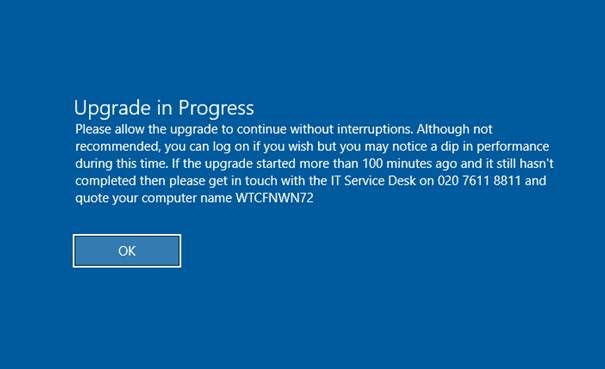
You can log back in again and continue working. You’ll see this message when logging on while the upgrade is in progress:

Upgrade in progress

You can continue working until you see a prompt to restart as mentioned earlier.

When the upgrade is complete:

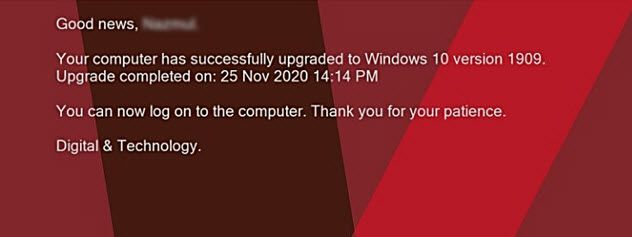
The message on the lock screen will change to say the upgrade finished successfully as shown below:

Upgrade complete

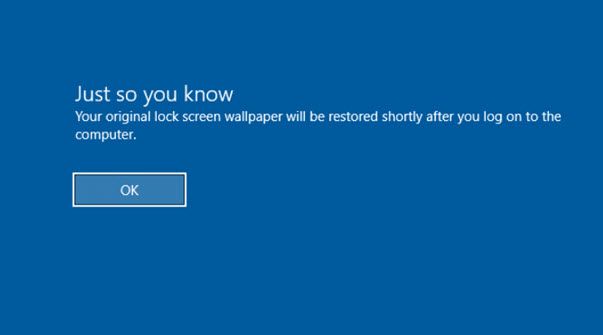
And when logging on you will see a message to say that your original lock screen wallpaper will be restored:

original lock screen wallpaper will be restored

Further support & information:

  • If the computer failed to upgrade, the lock screen wallpaper will display a message. You will still be able to login in and continue to work, despite the upgrade failure.
  • If this happens, please raise a ticket with Service Desk with ‘Windows10 upgrade fail’ in the subject line along with your device service tag in the description.
  • A member of the D&T team will be in touch, advising you of the failure and how to re-start the installation.

AppLocker Basics

I wrote a set of quick documentation on on AppLocker and it’s configuration for my workplace which I thought I’d post here. I’ve taken out anything specific to my workplace and here is the rest.

AppLocker Introduction

  • Define rules based on file path and file hash as well as rules based on file attributes such as the publisher, product name and file version.
  • Target these rules to specific security groups or individual users. You can also Exclude specific groups or users from the rule.
  • Create exceptions to rules such as blocking all applications exept winword.exe.
  • Use audit-only mode for what-if scenarios which are logged in EventViewer to analyse the impact should the rules be enforced

GPOs With AppLocker Rules

AppLocker rules are are configured in standard Group Policy Objects. This is where you would configure the rules in a GPO:

clip_image002

The following rules can be set using AppLocker:

Rule collection Note:
Executable Rules This is for allowing or denying .exe programs
Windows installer rules This is for MSI installers
Script rules This is for .vbs, .ps1, .cmd, .bat, etc
Packaged app rules This is for Universal Windows apps
DLL rules* This is for specific .dll files

*Note that the DLL rules node is not visible by default (as shown in the previous screenshot). To use DLL rules you have to enable it by right-clicking on “AppLocker” > Advanced tab > check “Enable the DLL rule collection”.

*If your script, exe or installer require the use of DLL files then you must also create rules for the DLL files in addition to the script/exe/installer.

Creating a AppLocker Rule

AppLocker rules are only configured in the Computer Configuration of a GPO but you can apply any rule to a specific group of users or set it to apply to the “Everyone” group.

It is recommended to create a set of default rules for each of the collection of rules. This is already done in the two GPOs that currently have AppLocker policies.

To create a rule for a executable right-click on “Executable Rules” under AppLocker and select “Create New Rule…”.

clip_image004

At this point you choose whether your rule is to Allow or Deny an executable from running. In other words, Allow is whitelisting an app and Deny is blacklisting an app.

You can also choose to apply this rule to a specific group of users by choosing an Active Directory security group or leave the default which is applied to the “Everyone” group.

clip_image006

You then have the option to choose a condition to meet to be able to apply this rule to an executable. Another way of looking at this is to work out how to identify the said executable. You have the following three options:

Condition/Option Notes
Publisher This will only work if the executable is signed by a software publisher. Alternatively you can sign the item using a certificate.
Path This tells AppLocker to expect to find the executable in a specific location. You can use wildcards for folder paths and filenames.

If the executable is moved a location which is not covered by a rule then the application will be allowed to run (since the executable was not in the path specified in this rule).

File hash If the application is not signed by a publisher then you can select the executable and AppLocker will generate a hash which uniquely identifies this executable.

If the executable is updated at any time in the future, the hash that was originally generated will not identify the updated executable. In this case the hash will need to be regenerated in AppLocker or else the rule will no longer apply to the application (since it has a different hash now).

For further information on understanding rule conditions consult the following Microsoft guide:

https://docs.microsoft.com/en-us/windows/security/threat-protection/windows-defender-application-control/applocker/understanding-applocker-rule-condition-types

Enforce Rule vs Audit Only

By default, the rules you create are set to “Audit only” which means the executables, scripts, etc will be allowed to run on client devices but everything will be logged in the Event Viewer so you can monitor what the behaviour will be like on a client device. The logs will say if the executables, scripts, etc was allowed to run or if it would have been blocked if the rules were enforced.

To enforce the rules you have to right-click AppLocker, select Properties and choose “Enforce rules” from the drop down under each rule collection:

clip_image008

Furthermore, it is necessary to understand how AppLocker rule collections are inherited in Group Policy. The following article can help understand inheritance:

https://docs.microsoft.com/en-us/windows/security/threat-protection/windows-defender-application-control/applocker/understand-applocker-rules-and-enforcement-setting-inheritance-in-group-policy

AppLocker Logs on Clients

You can examine the logs in the Event Viewer to troubleshoot AppLocker. The location of the logs are shown in the following screenshot:

clip_image010

To monitor the AppLocker logs on a remote computer you can use the following PowerShell code:

$Computer = “MNI-Win10PC”

Get-WinEvent -LogName “Microsoft-Windows-AppLocker/EXE and DLL” -ComputerName $Computer  # | Where-Object {$_.Id -eq 8004}

This will give you an output like the following:

image

Change the log name as appropriate (look this up in the Event View as shown in the above screenshot). This script will need to be run from your PAW device with your workstation admin account.

You can remove the # and filter the events to a specific event id. For example, event id 8004 is when something is blocked by AppLocker. For more information on event ids relating to AppLocker consult the following article:

https://docs.microsoft.com/en-us/previous-versions/windows/it-pro/windows-server-2012-r2-and-2012/ee844150(v%3Dws.11)

Process for whitelisting an application

  • Ensure you understand what the application does and that it does not present any security concerns

  • Ask the customer if this is a one-time use application or meant for only one or two computers. If so then consider moving the application to one of the locations mentioned above

  • Ask if the computer and the app in question is only used by a group of users

  • Install the application on a test computer and try and run it

  • Check the AppLocker event log and see if the app requires additional dll/files which are also blocked

  • Make note of the exact path mentioned in the AppLocker logs

  • Whitelist the app as per the instructions above under the heading “Creating a AppLocker rule”. Make sure you use the “Allow” option to whitelist the application.

  • To only allow the application to a select number of users only then create a group of AD users and filter the AppLocker rule to the group.

  • Decide whether to Allow the application based on its location (path), publisher, or hash. Consider the pros and cons set out in the table above.

Windows AutoPilot Feasibility

I recently carried out a feasibility study on Windows AutoPilot with a view to replicate as much as we can from my current Windows 10 task sequence for our staff devices. This is a quick post with my findings and recommendations.

Requirements for AutoPilot:

Windows 10 1703 or higher

All of our Windows 10 computers are 1809 or higher.

Microsoft Intune license

Covered by our EM+S E5 license

Azure Active Directory Premium

Covered by our EM+S E5 license

Device registration in Intune

Devices will need to be registered by Dell (OEM) or CDW (Reseller). Dell will register devices for free but will charge £30 fee per device to remove bloatware.
We will need to find out from CDW if they provide a service to register devices to Intune/AutoPilot and what the associated costs are.

Azure Active Directory custom branding

Custom branding has already been done in our tenant

Azure Active Directory automatic enrolment

This will need to be configured. This allows users to enroll devices to Intune (the enrolment takes place as part of the device set up process). However, enabling this raises the question “can we enable this and stop users from enrolling their personal devices into Intune as well?

Configure Autopilot profiles

This is a collection of rules and configurations to set up the computer during the device set up process.

Source: https://docs.microsoft.com/en-us/windows/deployment/windows-autopilot/windows-autopilot-requirements

Replicating the Task Sequence in AutoPilot and Intune

AutoPilot will only make sense for the standard Staff build since it is designed to be handed over to the user who goes through a few simple steps and then Intune kicks in.

Step

Notes

Clean Windows image

Possible options include:

BIOS Configurations (password, secure boot, TPM, etc)

BIOS configuration will need to be set either from the OEM or will need to be done after the computer is handed over to the user.

All computers come with UEFI, Secure Boot and TPM activated. The only exception is password and UEFI Network Stack. UEFI Network Stack is only required for PXE-boot which we don’t need for AutoPilot. However, password will need to be set using ‘Dell Command Configure’ post-deployment.

https://ccmexec.com/2019/09/configuring-dell-bios-settings-using-intune-win32app-and-powershell/

BIOS Updates

Although the BIOS updates can be packaged as an application and deployed via Intune it would be easier to manage this using SCCM (to be updated after deployed)

Set computer name

Naming ‘patterns’ can be set in the AutoPilot configuration profile. The %SERIAL% macro but unsure how flexible this is (for example truncating Surface Pro serial numbers and adding WT).

https://blog.basevision.ch/2019/06/ultimate-guide-to-define-device-names-in-windows-autopilot-hybrid-join-scenario/

Join on-premise domain

By default AutoPilot computers join Azure Active Directory. To join on-premise AD as well then additional configuration need to be done to enable Hybrid Azure AD Join.

https://docs.microsoft.com/en-us/intune/windows-autopilot-hybrid

Also requires TPM 2.0:

https://docs.microsoft.com/en-us/azure/active-directory/devices/hybrid-azuread-join-plan

Move to correct OU

You can select an OU to move all computers to as part of the AutoPilot configuration profile.

Currently in our environment we move laptops and desktops to separate OUs, which we cannot do using AutoPilot.

Our options are:

  • Setup AutoPilot for laptops only (and continue using SCCM for desktops)
  • Move both laptops and computers to the same OU but maintain separate AD groups to identify computers by hardware

Add to AD security groups

Computers can be added to Azure Groups but not to on-premise AD groups. Since this functionality is not provided natively by AutoPilot a solution will need to be engineered.

Driver updates

Similar to BIOS updates this will need to be managed using SCCM post deployment.

SCCM Client

Options are:

  • Deploy as a win32 app from Intune
  • Rely on SCCM client push installation (AD object gets discovered and client is deployed to the machine

Local admin account

https://docs.microsoft.com/en-us/azure/active-directory/devices/assign-local-admin

https://www.risual.com/2019/02/05/managing-local-admins-with-intune-azure-ad-join-devices/

Install staff build applications

Win32 applications can now be deployed through Intune

https://docs.microsoft.com/en-us/intune/apps-win32-app-management

https://www.robinhobo.com/how-to-deploy-win32-applications-with-microsoft-intune/

Install Office 365

Can be packaged as a package and deployed through Intune or Office 365 apps can be “assigned” to devices/users using Intune

  • If we deploy this as a package then it will continue to be patched through SCCM
  • If assigned to devices/users then it will be patched directly from Microsoft thus will need more work to understand how this works

https://docs.microsoft.com/en-us/intune/apps-add-office365

OneDrive auto sign in

This is possible using Azure AD Join.

Redirect user folders to OneDrive

Options are:

  • OneDrive Known Folder Move
  • Group Policy redirect

(will rely on Hybrid Azure AD Join)

Install Symantec

Although this is possible to be deployed using a package moving to AutoPilot might be an opportunity to trial Windows Defender?

This will require more discussions and input form the of Information Security.

Applications chosen by service desk

This feature will NOT be available through AutoPilot.

Alternative options are:

  • We enable applications to be deployed to users so Service Desk deploys the applications to users in advance and when the computer is in SCCM the application will be deployed to the user. However, we will need to make sure the application can only be installed on one device when deployed to the user.

Apply Start Menu Layout

A custom Start menu layout can be applied using Intune

https://docs.microsoft.com/en-us/windows/configuration/customize-windows-10-start-screens-by-using-mobile-device-management

Enable BitLocker

BitLocker can be enabled using Intune

https://www.sepago.de/blog/bitlocker-how-to-configure-bitlocker-drive-encryption-on-windows-10-clients-in-microsoft-intune/

Further research is required to make sure BitLocker uses TPM and the recovery key can be stored in the computer object in on-premise AD.

Run PowerShell scripts (Corporate font, registry tweaks, etc.

PowerShell scripts can be run from Intune

https://matthewjwhite.co.uk/2019/06/13/deploy-custom-fonts-to-intune-managed-devices/

https://docs.microsoft.com/en-us/intune/intune-management-extension

https://albertneef.wordpress.com/2018/06/01/part-16-configure-microsoft-intune-powershell-scripts/

Launch TrustNet at log on

TrustNet shortcut can be deployed using a PowerShell script in a package and deployed to the device using Intune.

Recommendations

With the ‘work from home’ scenario amid the current pandemic there is a real need to provision end user devices for new staff and making the onboarding process as simple as possible without access to the office. It is therefore absolutely necessary to take this work a step forward and carry out a proof of concept of Windows Autopilot which has the potential of simplifying the end user device provisioning and onboarding process.

References:

https://docs.microsoft.com/en-us/windows/deployment/windows-autopilot/user-driven
https://www.scconfigmgr.com/2019/04/01/replicating-task-sequences-in-autopilot-part-1-bare-metal/

How I Went from MDT Integrated Task Sequence to Native SCCM

I started a new job six months ago as a EUC/SCCM Engineer where, after having delivered a couple of high profile objectives, one of the goals I have set myself is to combine 3 task sequences into one and to simplify the resulting Task Sequence.

I initially considered dumping the MDT integrated Task Sequence and going native SCCM, favouring the clean and simplified layout of the native TS in comparison to the MDT integrated one. But after a little deliberation I dismissed the idea since I was hoping to spin up a MDT database to make the Task Sequence and the build process truly dynamic, plus I really liked having all those extra task sequence variables that comes with MDT.

But then Gary Blok (from garytown.com) tweeted that he had moved away from MDT integrated to native SCCM and I was swayed again by his clean all-native task sequence. He even provided instructions on how to create a “MDT Lite” package which gave you access to all the additional task sequence variables without all the bloat.

So, taking inspiration from Gary I decided to go native SCCM.

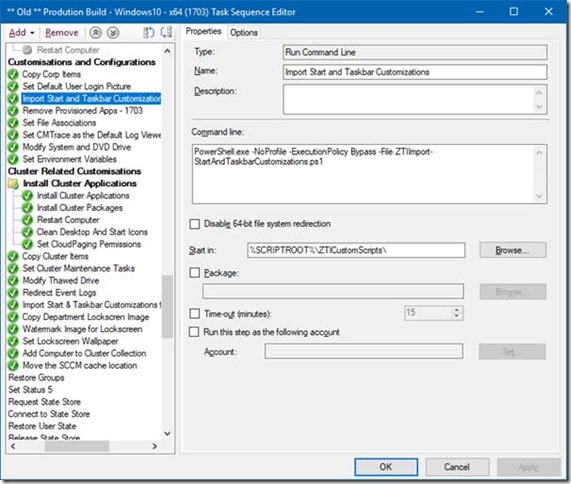
In my MDT integrated task sequence I have all my PowerShell scripts in a folder called “ZTICustomScripts” which sits in the Scripts folder in the MDT Toolkit Files package. That way I can call the script by referencing the “%SCRIPTROOT%” variable, like below:

clip_image002

I knew that if I wanted to move to native SCCM task sequence then I will need to be able to still reference the “%SCRIPTROOT%” variable, which would mean I can copy and paste these steps from one TS to another.

I followed Gary’s blog post to create my MDT Lite package, except for copying the BGInfo files since I use the excellent OSD Background tool instead. Of course, I also added my ZTICustomScripts folder which contains all my PowerShell scripts:

image

I created a package called MDT Lite with the above contents. This is how I used it in my new all-native Task Sequence:

Created a group called “Download MDT Lite” right after the partitioning steps.

Added a “Download Package Content” task and called it “Download MDT Lite Package”. I selected the MDT Lite package I created and set the download location to “Task Sequence working directory”. I checked “Save path as a variable” and chose “MDTLite” as the variable name.

image

Note that to be able to reference the contents of this package we have to append “01” to the name of the variable, thus “MDTLite01”. (If we had a second package to download in the list then that package location would be referenced as “MDTLite02”.)

I can now reference the Scripts folder within this package as “%MDTLite01%\Scripts”, but that would mean updating each and every one of my Run Command Line steps with the new path which is something I did not want to do. So I set my own custom task sequence variable called “SCRIPTROOT” and set its value to “%MDTLite01%\Scripts”, shown below:

image

This meant that I can just copy and paste my Run Command Line steps (which run my PowerShell scripts) to the new native task sequence with very little to no changes. I can also create a nested Task Sequence with all the steps to run my scripts which I can use in the MDT integrated TS and the native TS which has not gone into production just yet (and thus avoid duplication of efforts).

Lastly I done the same for the %ToolRoot% variable as well.

The resulting task sequence is a lot leaner and much easier to take in.

Choose a Disk to Install Windows on using WPF and PowerShell

I recently tweeted a screenshot of a GUI I created using WPF and PowerShell to let engineers choose the disk to install Windows on, intended to be used in a SCCM Task Sequence. I was then asked by (none other than!) David Segura to share this with the rest of the community.

In my last post I wrote about how I found a workaround to a snag I hit upon while using the MahApps.Metro theme. That was almost 10 months ago. That post was meant to be a precursor to introducing this GUI but I got busy with life and my new job so the blog took a back seat. I’m glad that David’s reply has spurred me on to write this post and introduce the GUI. (I also have a few more posts lined up inspired by Gary Blok’s endeavour to break away from MDT and go native ConfigMgr. More on that soon.)

Update 1: I included steps in the Task Sequence to make the GUI appear only if more than one disk is present, as suggested by Marcel Moerings in the comments.

Update 2: I updated the script to exclude USB drives.

Background

SCCM will install the OS on disk 0 by default. In my previous environment two disk configurations were very common so I created this GUI for Engineers to choose the disk to install Windows on. This works by leveraging the “OSDDiskIndex” task sequence variable. If you set this variable to your desired disk number then SCCM will install the OS on that disk.

This is what the GUI looks like when run in full OS:

clip_image003

And this is what it looks like when run in a Task Sequence:

clip_image005

Prerequisites

You will need to add the following components to your Boot Image:

  • Windows PowerShell (WinPE-PowerShell)
  • Windows PowerShell (WinPE-StorageWMI)
  • Microsoft .Net (WinPE Dot3Svc)

How to Implement

Simples :)

  • Download the solution and extract the zip file
  • Create a standard package with the contents of the zip file. Do not create a program.
  • In your task sequence add a Group called “Choose Disk” before the partitioning steps
  • Within the group add a Run Command Line task and name it “Check if there’s more than one Hard Disk”. Enter the following one-liner:
PowerShell.exe -NoProfile -Command "If ((Get-Disk | Where-Object -FilterScript {$_.Bustype -ne 'USB'}).Count -gt 1) {$TSEnv = New-Object -COMObject Microsoft.SMS.TSEnvironment;$TSEnv.Value('MoreThanOneHD') = $true}"

one liner

  • Add another Run Command Line step and name it “Choose Disk to Install OS”, and choose the package you created. Add the following command line:
%SYSTEMROOT%\System32\WindowsPowerShell\v1.0\powershell.exe -STA -NoProfile -ExecutionPolicy Bypass -File .\ChooseDiskWPF.ps1

choose disk

  • In the Options tab for the “”Choose Disk to Install OS” step, Click on Add Condition > Task Sequence Variable > type “MoreThanOneHD” in the variable field, set the condition to “equals” and the value to “TRUE”

condition

Bear in mind that this does not exclude removable drives. This is because I always run a set of pre-flight checks as a first step which weed out any removable drives before this GUI is presented hence looking out for removable drives was not duplicated in this solution.

The Code

Clear-Host 


# Assign current script directory to a global variable

$Global:MyScriptDir = [System.IO.Path]::GetDirectoryName($myInvocation.MyCommand.Definition)


# Load presentationframework and Dlls for the MahApps.Metro theme

[System.Reflection.Assembly]::LoadWithPartialName(“presentationframework”| Out-Null

[System.Reflection.Assembly]::LoadFrom($Global:MyScriptDir\assembly\System.Windows.Interactivity.dll”| Out-Null

[System.Reflection.Assembly]::LoadFrom($Global:MyScriptDir\assembly\MahApps.Metro.dll”| Out-Null


Temporarily close the TS progress UI

$TSProgressUI = New-Object COMObject Microsoft.SMS.TSProgressUI

$TSProgressUI.CloseProgressDialog()


# Set console size and title

$host.ui.RawUI.WindowTitle = “Choose hard disk…”


Function LoadForm {

    [CmdletBinding()]

    Param(

     [Parameter(Mandatory=$True,Position=1)]

     [string]$XamlPath

    )


    # Import the XAML code

    [xml]$Global:xmlWPF = Get-Content -Path $XamlPath


    Add WPF and Windows Forms assemblies

    Try {

        Add-Type AssemblyName PresentationCore,PresentationFramework,WindowsBase,system.windows.forms

    }

    Catch {

        Throw “Failed to load Windows Presentation Framework assemblies.”

    }


    #Create the XAML reader using a new XML node reader

    $Global:xamGUI = [Windows.Markup.XamlReader]::Load((new-object System.Xml.XmlNodeReader $xmlWPF))


    #Create hooks to each named object in the XAML

    $xmlWPF.SelectNodes(“//*[@Name]”| ForEach {

        Set-Variable -Name ($_.Name) -Value $xamGUI.FindName($_.Name) -Scope Global

    }

}


Function Get-SelectedDiskInfo {

    # Get the selected disk with the model which matches the model selected in the List Box

    $SelectedDisk = Get-Disk | Where-Object $_.Number eq $Global:ArrayOfDiskNumbers[$ListBox.SelectedIndex] }


    # Unhide the disk information labels

    $DiskInfoLabel.Visibility = “Visible”

    $DiskNumberLabel.Visibility = “Visible”

    $SizeLabel.Visibility = “Visible”

    $HealthStatusLabel.Visibility = “Visible”

    $PartitionStyleLabel.Visibility = “Visible”


    # Populate the labels with the disk information

    $DiskNumber.Content = $($SelectedDisk.Number)

    $HealthStatus.Content = $($SelectedDisk.HealthStatus)$($SelectedDisk.OperationalStatus)

    $PartitionStyle.Content = $SelectedDisk.PartitionStyle


    # Work out if the size should be in GB or TB

    If ([math]::Round(($SelectedDisk.Size/1TB),2lt 1) {

        $Size.Content = $([math]::Round(($SelectedDisk.Size/1GB),0)) GB”

    }

    Else {

        $Size.Content = $([math]::Round(($SelectedDisk.Size/1TB),2)) TB”

    }

}


# Load the XAML form and create the PowerShell Variables

LoadForm XamlPath $MyScriptDir\ChooseDiskXAML.xaml


# Create empty array of hard disk numbers

$Global:ArrayOfDiskNumbers = @()


# Populate the listbox with hard disk models and the array with disk numbers

Get-Disk | Where-Object -FilterScript {$_.Bustype -ne ‘USB’} | Sort-Object {$_.Number}| ForEach {

    # Add item to the List Box

    $ListBox.Items.Add($_.Model) | Out-Null


    # Add the serial number to the array

    $ArrayOfDiskNumbers += $_.Number

}


# EVENT Handlers

$OKButton.add_Click({

    If no disk is selected in the ListBox then do nothing

    If (-not ($ListBox.SelectedItem)) {

        # Do nothing

    }

    Else {

        Else If a disk is selected then get the disk with matching disk number according to the ListBox selection

        $Disk = Get-Disk | Where-Object {$_.Number eq $Global:ArrayOfDiskNumbers[$ListBox.SelectedIndex]}


        Set the Task Sequence environment object

        $TSEnv = New-Object COMObject Microsoft.SMS.TSEnvironment


        # Populate the OSDDiskIndex variable with the disk number

        $TSEnv.Value(OSDDiskIndex= $Disk.Number


        # Close the WPF GUI

        $xamGUI.Close()

    }

})


$ListBox.add_SelectionChanged({ 

    # Call function to pull the disk informaiton and populate the details on the form

    Get-SelectedDiskInfo

})


# Launch the window

$xamGUI.ShowDialog(| Out-Null

Unable to Import MahApps.Metro DLL Files using PowerShell in SCCM/MDT Boot Image

I’ve been working on converting some of my PowerShell scripts for SCCM into Graphical User Interfaces (GUIs), specifically using Windows Presentation Foundation (WPF). I’ve been a long admirer of the ConfigMgr OSD Front End from scconfigmgr.com by Nickolaj Andersen who pointed me to the MahApps.Metro theme when I complimented him on the aesthetics of his Front End.

I’d recommend checking out the instructions by Kevin Rahetilahy on his blog at dev4sysblog and Damien Van Robaeys’s how-to video on creating WPF GUIs and applying the MahApps.Metro theme.

Now, coming back to this post. Getting the MahApps.Metro theme to work with the WPF GUI requires loading a couple of DLL files in the PowerShell script but annoyingly I ran into a problem where the DLLs wouldn’t import in the SCCM/MDT boot images In WindowsPE but works flawlessly in Windows 10. This is the error message I was getting:

“Could not load file or assembly MahApps.Metro.dll or one of its dependencies. Operation is not supported.”

image

Attempting to load “System.Windows.interactivity.dll” also threw the same error message. I also tried changing the DLL files from .Net 4.0 to 4.5 and also tried solutions from the community which presented me with the same error message each time. I knew these community solutions work in other environment so there was something definitely wrong from my end.

After trying a lot of different things I finally managed to resolve this with a workaround. Here’s what I done.

First, let’s take a look at the three DLLs I’ve been trying to load in my script.

[System.Reflection.Assembly]::LoadWithPartialName("presentationframework")
[System.Reflection.Assembly]::LoadFrom("$MyScriptDir\assembly\MahApps.Metro.dll")
[System.Reflection.Assembly]::LoadFrom("$MyScriptDir\assembly\System.Windows.Interactivity.dll")

The first DLL, the “presentationframework.dll”, imported successfully whereas the other two failed consistently no matter what I tried. After concentrating far too long on the two problematic DLLs and failing to come up with a solution I decided to take a closer look at the “presentationframework.dll”. When I load this DLL I get the following output in my console:

image

I saw that the DLL was being loaded from “X:\WINDOWS\Microsoft.Net\assembly\GAC_MSIL\presentationframework\v4.0_4.0.0.0__31bf3856ad364e35”.

So I decided to manually create this folder structure as shown below for each of my DLL files and copy them over:

Folder structure to create and location to copy MahApps.Metro.dll:

“X:\WINDOWS\Microsoft.Net\assembly\GAC_MSIL\MahApps.Metro\v4.0_4.0.0.0__31bf3856ad364e35\MahApps.Metro.dll”

Folder structure to create and location to copy System.Windows.Interactivity.dll:

“C:\WINDOWS\Microsoft.Net\assembly\GAC_MSIL\System.Windows.Interactivity\v4.0_4.0.0.0__31bf3856ad364e35\System.Windows.Interactivity.dll”

I then tried loading the DLL files using the following lines:

[System.Reflection.Assembly]::LoadWithPartialName("System.Windows.Interactivity")
[System.Reflection.Assembly]::LoadWithPartialName("MahApps.Metro")

And voila! The two DLL files were loaded successfully!

image

The GUI and the theme works absolutely fine with this workaround. I spent a lot of time grappling with this problem so it was a relief to finally have it resolved, not to mention my GUI looks so much better with the theme. I just had to write this post not only for my own reference but also hoping it may help someone else out there too.

I’m refraining myself from inserting a screenshot of the GUI as I want to write a separate post introducing it to the community :)